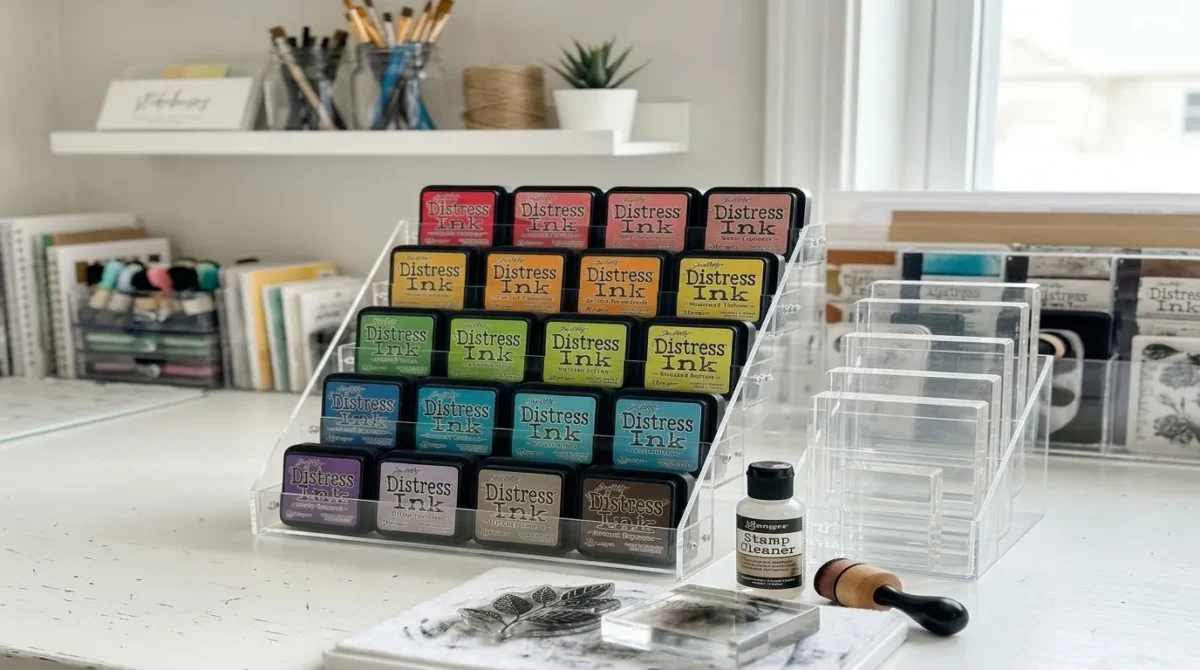
A craft room makeover is the process of reorganizing and redesigning a creative workspace to maximize storage, improve workflow, and make every supply instantly accessible — so you spend more time making and less time searching. This article gives you 13 actionable craft room organization ideas that work whether you have a dedicated room, a shared space, or just a closet to call your own.
Picture walking into your creative space and knowing exactly where everything lives. No rummaging through bins, no buried scissors, no mystery boxes stacked in corners. Just clean surfaces, labeled jars, and a room that actually invites you to sit down and create. These aren’t just storage hacks — they’re spatial decisions that change how you feel about making things. Here are 13 ideas worth saving — and stealing.
Why a Craft Room Makeover Works So Well
A craft room makeover isn’t about buying more furniture — it’s about creating intentional systems where every category of supply has a permanent, logical home. This style of functional creative space design draws from the organizing philosophy of studio artists and professional makers, blending practical storage architecture with personal aesthetic expression. The result is a space that supports the way you actually work, not an idealized version of it.
The materials that define a well-organized craft room are honest and visible: open pegboards in white or natural birch, clear acrylic drawer units, galvanized wire baskets, kraft paper labels, pine floating shelves, and matte black metal hooks. Colors stay calm so supplies become the visual interest — warm white walls, natural wood tones, soft sage green, and the occasional terracotta accent through storage containers.
The craft room organization trend accelerated sharply after 2020, when millions of people returned to hobbies at home and found their supplies scattered across closets, kitchen drawers, and bedroom corners. Pinterest boards for craft room ideas now generate billions of annual impressions, with organized, light-filled studio setups consistently ranking as the most-saved home content category after kitchens.
Even the smallest dedicated space — a 6×8 foot spare room or a deep closet with the doors removed — can be transformed into a fully functional craft studio. For tight footprints, the principle is simple: go vertical first, keep countertop surfaces clear, and organize by frequency of use rather than by category.
Style at a Glance
| Element | Trait 1 | Trait 2 |
|---|---|---|
| Philosophy | Function-first, system-driven design | Visible organization as visual inspiration |
| Materials | Pegboard, pine shelving, acrylic drawers, wire baskets | Kraft labels, matte black hardware, clear bins |
| Color Palette | Warm white, natural birch, soft sage green | Terracotta accent, natural linen, matte black |
1. Floor-to-Ceiling Pegboard Wall
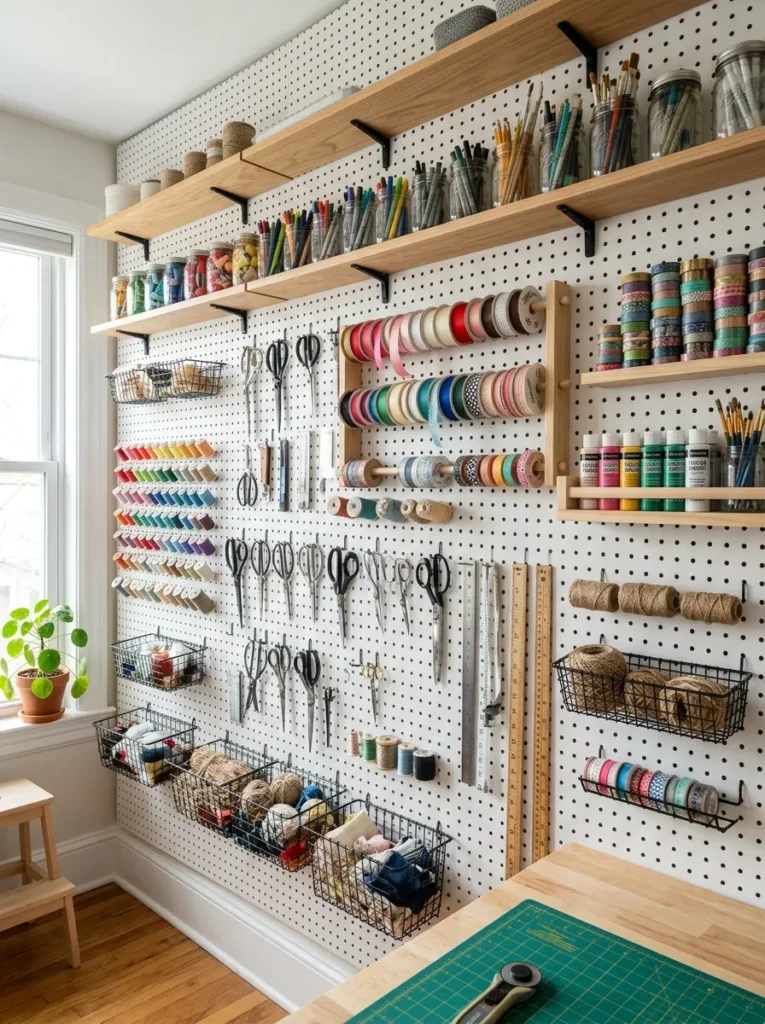
Vibe: Energized and open — a wall that works as hard as you do.
Why it works: A full-height pegboard wall applies the principle of vertical surface activation — turning unused wall space into the most functional square footage in the room. Unlike fixed shelving, pegboard is infinitely reconfigurable: hooks, baskets, and shelves slide into new positions as your supply collection evolves. The visual display of organized tools also serves a creative function, keeping supplies visible and mentally accessible so ideas connect faster during a project.
How to get it: Mount 4×8 foot pegboard panels (¼-inch thickness, standard hole spacing) to the wall using 1-inch furring strips between the board and wall — this gap is essential to allow hooks to insert fully. Paint the board with two coats of white semi-gloss latex before mounting for a clean finish. Use a mix of single hooks, double hooks, wire baskets, and small wooden ledge shelves to create zones by supply type.
Quick Win: A single 4×4 foot pegboard section costs under $20 at most home improvement stores and can be installed over a single weekend — start with one panel above your main work surface before committing to a full wall.
Shop The Look
- White pegboard panel 4×8 ft standard hole
- Matte black pegboard hook set assorted sizes
- Pegboard wire basket organizer set
- Pegboard wooden shelf bracket small
- Glass storage jar set with lids Craft Room supply
Also view: 22 Easter Porch Decorating Ideas for a Cheerful Entry
2. Clear Acrylic Drawer Tower for Small Supplies
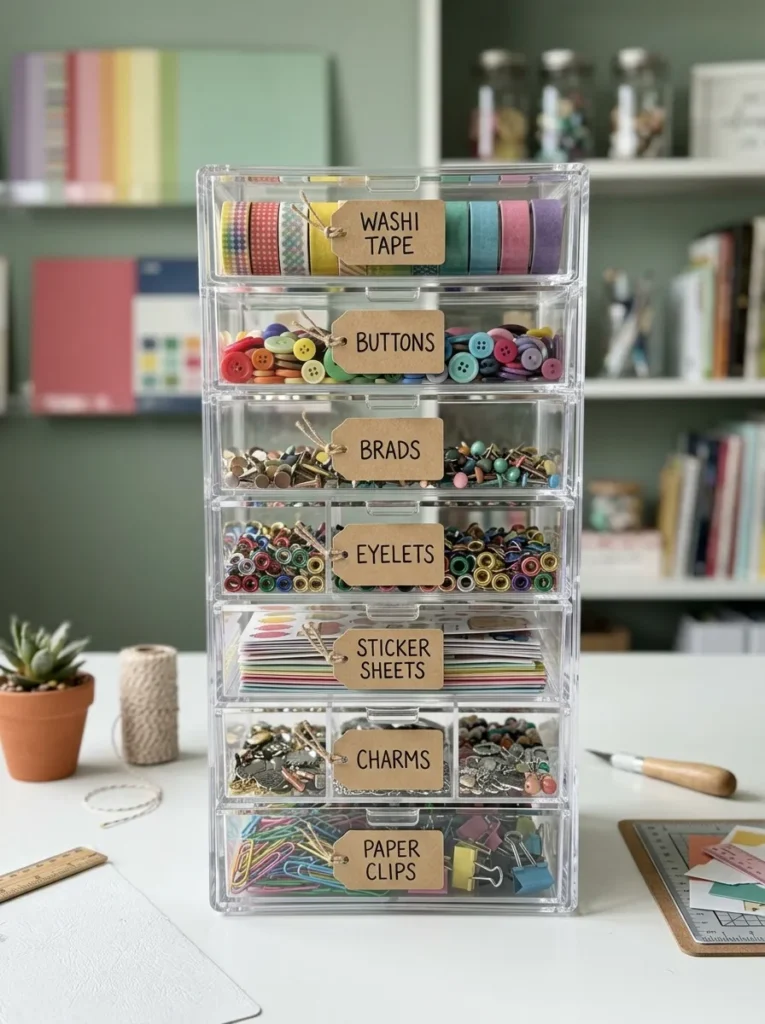
Vibe: Still and sorted — the visual calm of knowing exactly where everything is.
Why it works: Clear acrylic drawer units solve the single most frustrating problem in craft storage: supplies hidden in opaque bins become supplies forgotten. When every drawer is see-through, the entire inventory is visible at a glance, eliminating the time wasted opening and closing containers to find one brad or the right shade of washi tape. The tower format also uses vertical desk space efficiently, stacking storage upward rather than spreading it across the surface.
How to get it: Choose a tower with drawers sized to your smallest supplies — 2-inch-deep drawers for flat items like stickers and die cuts, 3–4-inch drawers for bulkier items like stamps and ink pads. Sort by color or by supply type — both systems work, but pick one and commit. Add adhesive-backed kraft paper label holders to each drawer front for a clean, consistent look.
Shop The Look
- Clear acrylic drawer tower 12 drawer desktop
- Kraft paper adhesive label holders drawer front
- Washi tape storage dispenser clear
- Small bead and button organizer tray insert
- Matte black label maker handheld
Also view: 11 IKEA NORDLI DIY Hacks for Modern Homes
3. Dedicated Fabric Bolt Wall with Dowel Display
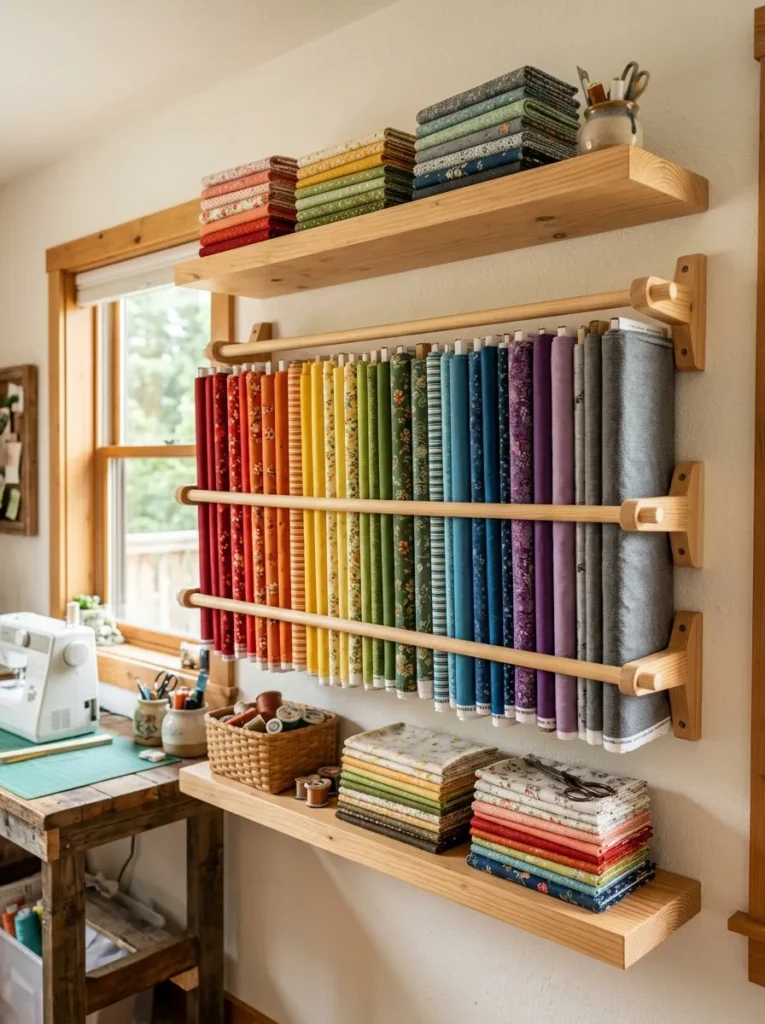
Vibe: Warm and layered — a fabric wall that doubles as art.
Why it works: Fabric is one of the hardest craft supplies to store well because it needs to stay wrinkle-free, visible, and accessible without taking over a room. A wall-mounted dowel system solves all three problems simultaneously. Rolling fabric onto cardboard bolts and hanging them on horizontal dowels keeps them visible by color, prevents creasing, and turns your fabric collection into a deliberate wall display rather than a pile to dig through. Color-sorting by hue also makes color-matching intuitive during project planning.
How to get it: Mount two horizontal rows of wooden dowels (1-inch diameter closet dowels cut to 12-inch lengths) between brackets screwed directly into wall studs. Space rows 8 inches apart vertically to accommodate standard fabric bolt rolls. Wind each fabric piece onto a cardboard bolt card — the kind used in fabric stores — and slide them onto the dowels, sorted lightest to darkest within each color family.
Quick Win: Cardboard bolt cards are free at most fabric stores — ask at the cutting counter, as they discard them after bolts run out. Wind your existing fabric onto them this weekend for instant visual organization.
Shop The Look
- Wooden closet dowel rod 1 inch diameter pack
- Dowel rod wall bracket set
- Pine floating shelf set wall mounted
- Cardboard fabric bolt winding cards pack
- Clear hanging fabric bolt label tags
4. Rolling Cart Station for Active Projects
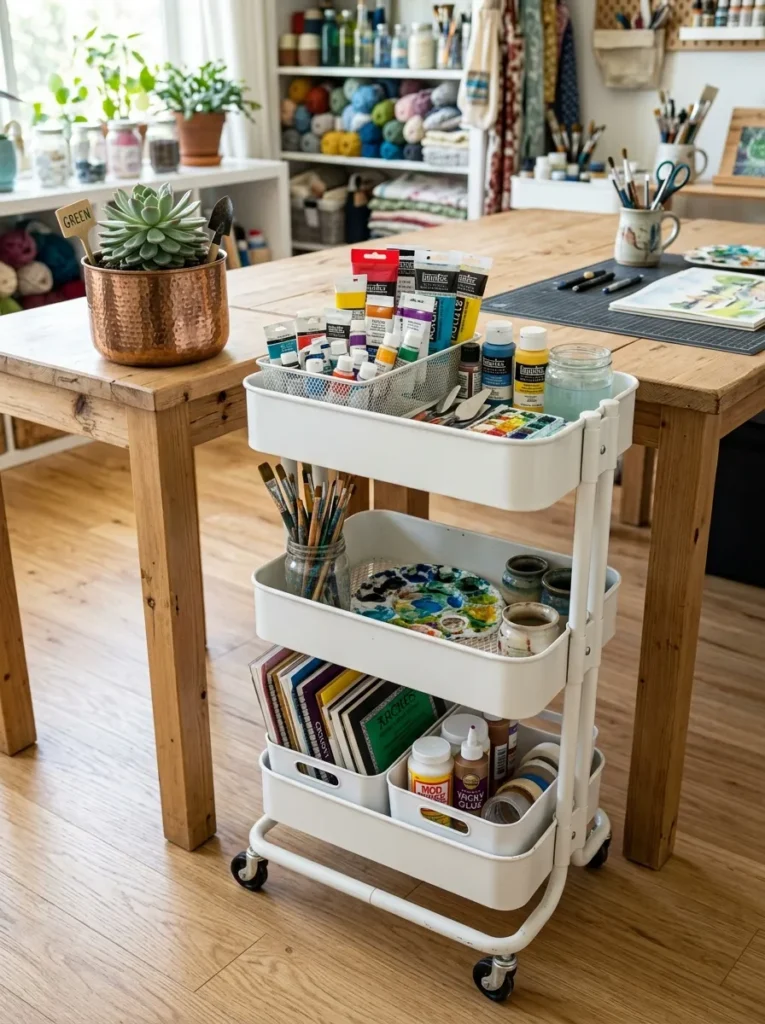
Vibe: Ready and airy — a workspace that’s always one roll away from starting.
Why it works: The rolling cart solves what professional studio artists call the “project momentum” problem — when supplies for an active project get put away between sessions, the friction of getting them back out kills creative momentum. A dedicated rolling cart stays loaded with the current project’s supplies and rolls to wherever you’re working: the desk, the dining table, even outdoors. This also keeps your main work surface clear, since active supplies have their own mobile home.
How to get it: Use a three-tier rolling metal utility cart (the RÅSKOG style is widely available and widely copied) and assign each tier a project role: top tier for tools in use, middle tier for materials, bottom tier for reference materials or cleanup supplies. Keep a small labeled bin on the bottom tier for returning stray supplies to their permanent storage after each session.
Shop The Look
- Three-tier rolling metal utility cart white
- Small metal storage bin set for cart tiers
- Bamboo desk organizer pencil cup set
- Copper ceramic mini planter pot
- Silicone paint palette tray reusable
5. Ribbon and Trim Organization with Tension Rods
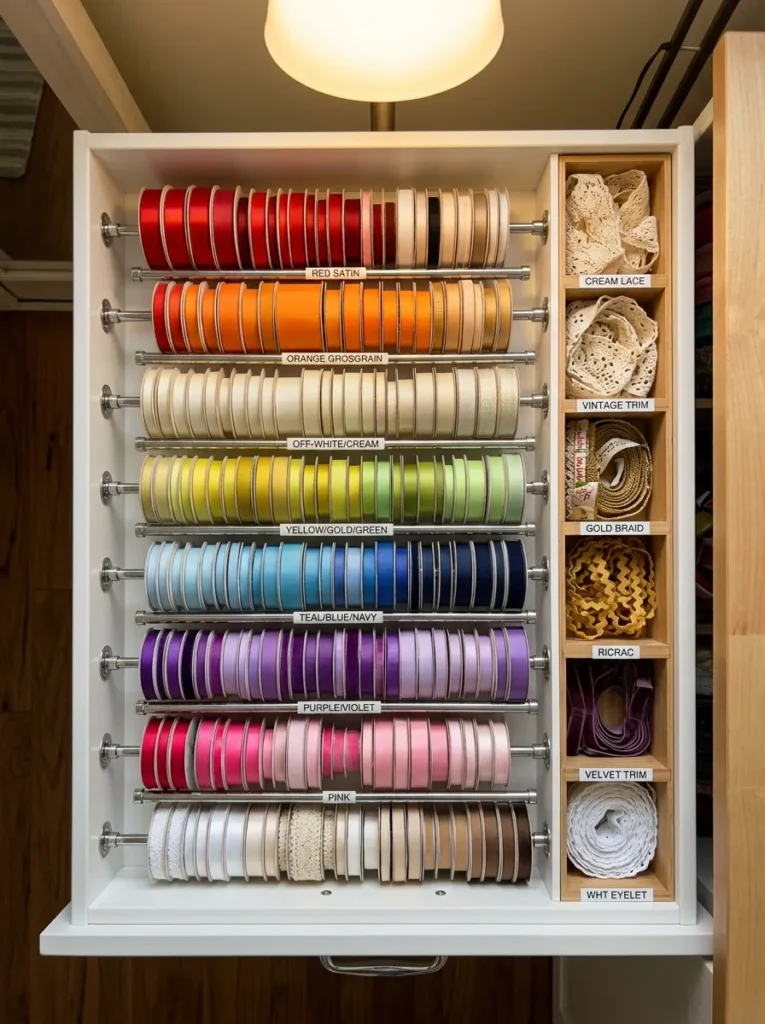
Vibe: Quietly satisfying — the drawer that makes you feel like a professional.
Why it works: Ribbon is notoriously difficult to store because spools unravel the moment they’re tossed loose in a bin. Tension rods suspended across a drawer width hold each spool upright and allow ribbon to be pulled out from the front without removing the spool — the same principle used in professional haberdashery shops. The tension rod system costs under $10 per drawer and converts any standard deep drawer into a ribbon dispensing station that serves up exactly the length you need, instantly.
How to get it: Measure the interior width of your drawer and purchase spring-loaded tension rods in that size range (the same type used in kitchen cabinets for organizing lids). Lay 2–3 rods horizontally across the drawer at evenly spaced intervals and slide ribbon spools onto each rod. Sort by color family, then by width within each color. Place small coils of trim and lace in the gaps between rod zones.
Quick Win: Two tension rods in a standard kitchen drawer hold up to 20 ribbon spools and cost under $8 total — the single fastest ribbon organization upgrade available.
Shop The Look
- Spring tension rod set small cabinet size
- Ribbon spool organizer drawer insert
- Decorative trim lace ribbon assorted pack
- Drawer divider set adjustable white
- Clear adhesive drawer label strips
6. Wall-Mounted Paper Storage with Vertical Slots
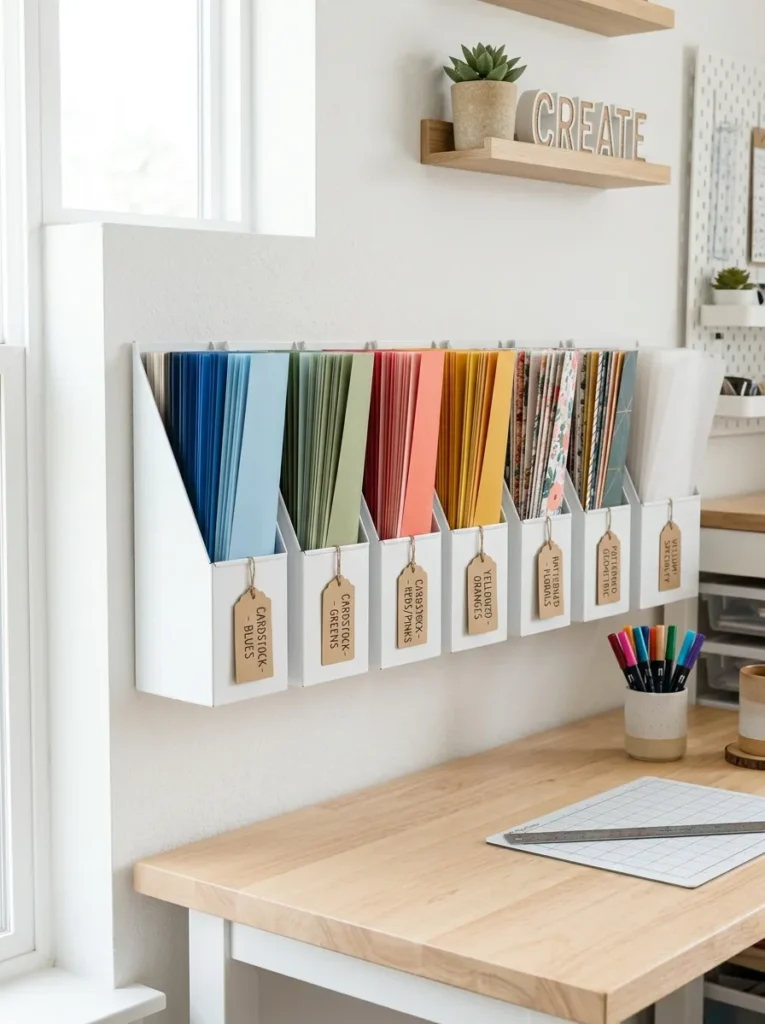
Vibe: Clean and deliberate — a paper collection that’s accessible without ever becoming a pile.
Why it works: Paper storage is where most craft rooms collapse into chaos — flat stacks become unsorted piles, and finding one specific color or pattern means pulling everything out. Vertical wall-mounted slots apply the same visual logic as a filing system: each category is immediately identifiable from the front edge of the paper without disturbing any other slot. Mounting this system on the wall above the work surface also keeps the desk clear, since paper lives on the wall instead of in a pile beside the printer.
How to get it: Mount a row of magazine file holders (metal or acrylic, wall-mounted style) horizontally across the wall at eye level above your desk. Assign each slot a paper category: solid cardstock by color family, patterned paper by theme, vellum, kraft, and specialty papers each in their own slot. Label each holder with a printed or handwritten kraft tag clipped to the front.
Shop The Look
- Wall-mounted metal magazine file holder set
- Kraft paper label tags with string pack
- Cardstock paper assorted color pack 65 lb
- Acrylic wall file holder clear set of 6
- Small binder clip set black assorted sizes
7. Dedicated Cutting Station with Fold-Down Wall Desk
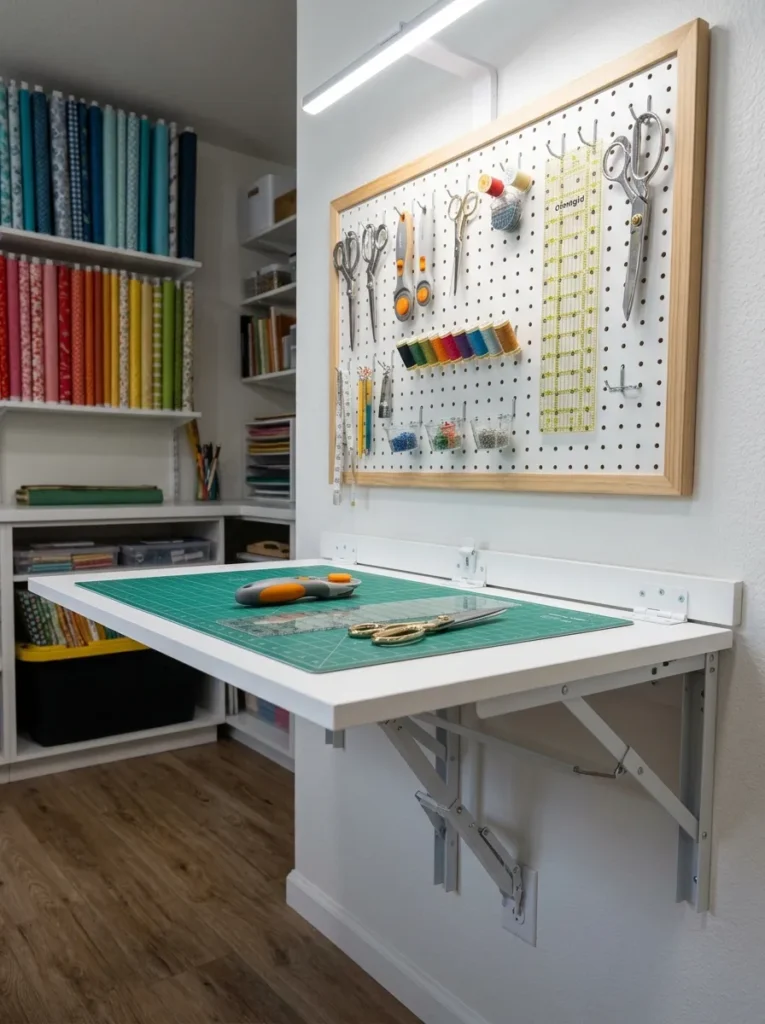
Vibe: Precise and purposeful — the corner of the room where real work happens.
Why it works: Cutting requires a dedicated, clear surface that’s at the right ergonomic height — typically 36 inches, the same as a kitchen counter — and most Craft Room tables are too low and too cluttered to serve this function well. A fold-down wall desk creates a purpose-built cutting station that disappears when not in use, freeing up floor space in smaller rooms. When open, the surface is dedicated entirely to cutting, which means the cutting mat stays flat, tools stay organized, and measurements stay accurate.
How to get it: Install a wall-mounted fold-down desk bracket at 36-inch height (counter height) using lag screws into wall studs — this surface carries real weight when loaded with fabric or a large cutting mat. Top the desk with a 24×36-inch self-healing cutting mat with a printed grid for accurate measuring. Mount a pegboard section directly above to hold the rotary cutter, rulers, and scissors within arm’s reach of the cutting surface.
Quick Win: A 24×36-inch self-healing cutting mat with a printed grid costs $20–$35 and instantly upgrades any flat surface into a proper cutting station — the grid alone reduces measuring time by half.
Shop The Look
- Wall-mounted fold-down desk bracket kit white
- Self-healing cutting mat 24×36 with grid
- Rotary cutter 45mm ergonomic handle
- Acrylic quilting ruler set assorted sizes
- Task lamp LED clamp-on adjustable arm
8. Color-Sorted Thread and Floss Wall Display
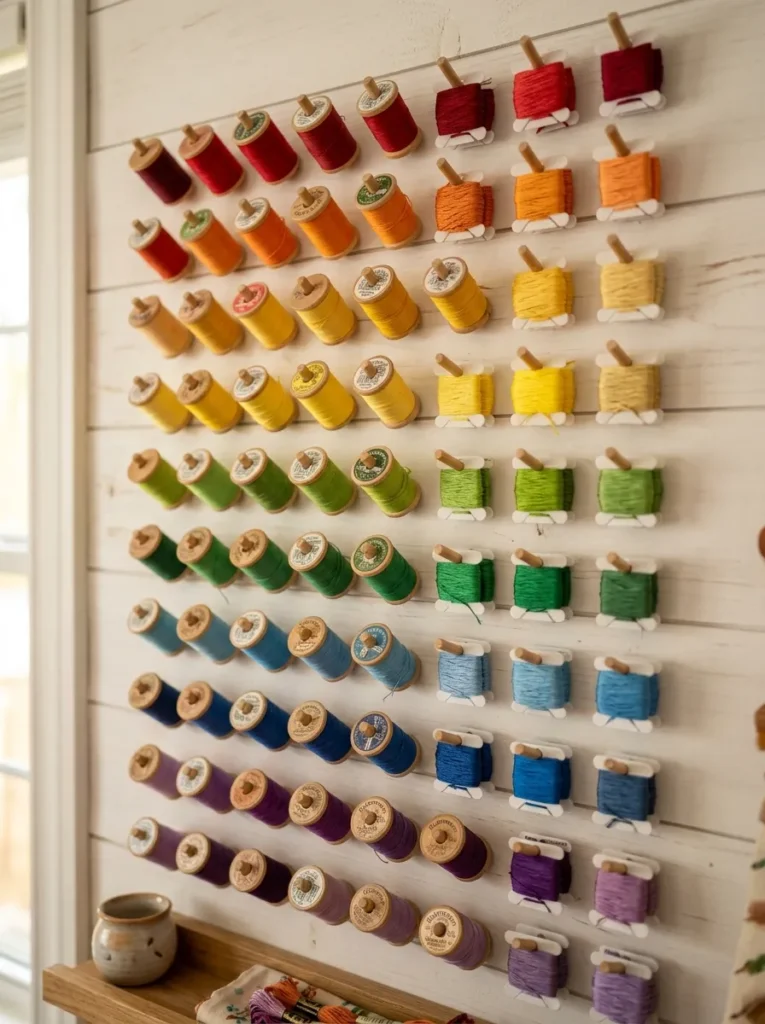
Vibe: Visually rich and sun-warmed — storage that functions as the room’s most compelling artwork.
Why it works: Thread and embroidery floss are the supplies most likely to turn into a tangled mess in a bin, and most likely to be purchased twice because you forgot what you already owned. A wall-mounted spool display solves both problems: spools stay separated, visible, and sorted by color, making both inventory-taking and color-matching effortless. Sorted into spectrum order — warm to cool, light to dark — the display becomes a genuine visual installation that adds personality to the room without any decorating effort.
How to get it: Purchase small wooden thread holder pegs (often sold in packs of 50) and screw them directly into a wall-mounted plywood backing panel or directly into a shiplap accent wall, spaced 2 inches apart in a grid pattern. Sort existing thread into ROYGBIV order before mounting — this sorting session alone usually reveals dozens of duplicates. Label the backing panel with color families using a fine-tip paint marker for easy restocking.
Shop The Look
- Wooden thread spool holder peg pack of 50
- White shiplap peel-and-stick wall panel
- Embroidery floss bobbin set assorted colors
- Thread spool organizer bobbin winder
- Fine-tip paint marker white set
9. Dedicated Stamp and Ink Pad Station
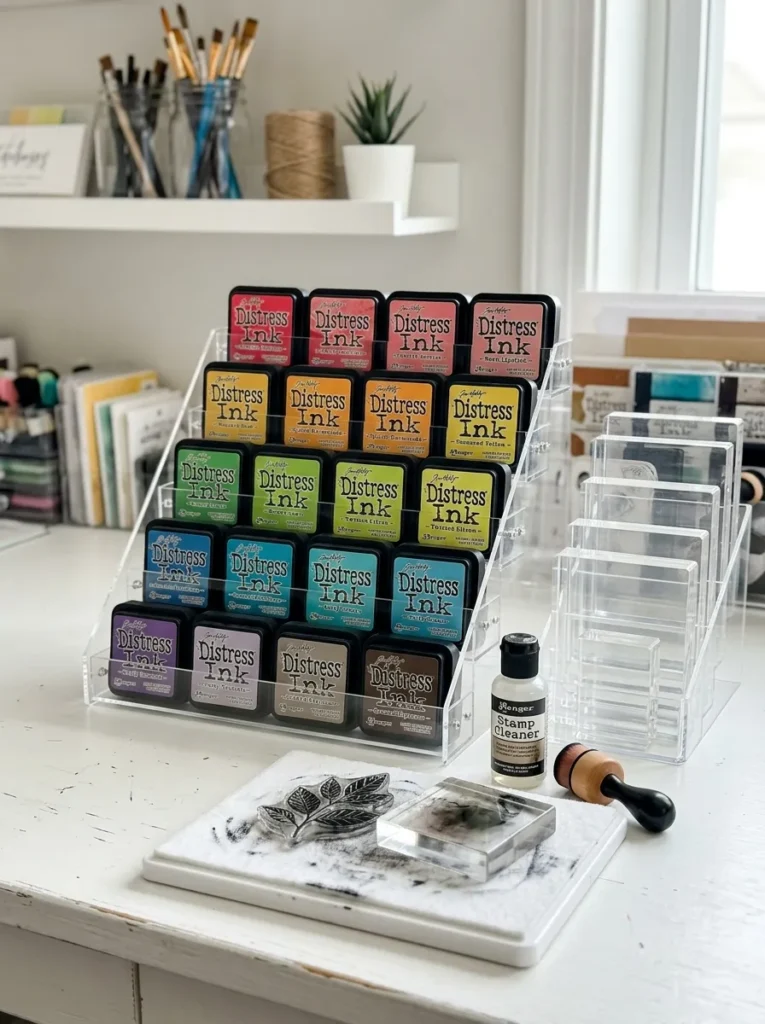
Vibe: Systematic and satisfying — a station built around the way stamping actually works.
Why it works: Stamp and ink pad storage fails when ink pads are stacked face-down (which dries them out) or stored in bins where colors can’t be identified at a glance. Tiered acrylic risers display ink pads at a slight upward angle, labels facing forward, sorted by color family — exactly replicating the display system used in Craft Room store demos. This setup also keeps all stamping supplies in one contained zone, so an entire stamping session can be set up and cleared away in under two minutes.
How to get it: Use a 3-tier acrylic stepped riser (the kind sold for makeup or spice organization) on your main desk and sort ink pads by color family across the tiers, warmest colors on the top tier, neutrals on the middle, cool colors on the bottom. Store clear acrylic stamping blocks in a small shallow tray beside the riser so they’re visible and don’t stack. Keep a stamp shammy or foam cleaning pad within arm’s reach at all times.
Quick Win: A three-tier acrylic riser costs $12–$18 and immediately transforms a chaotic ink pad collection into a color-sorted display — most crafters find they were missing colors they already owned once everything is visible at once.
Shop The Look
- Three-tier acrylic desktop riser organizer
- Clear acrylic stamp storage block set
- Stamp cleaning shammy pad white
- Ink pad storage tray slanted display
- Distress ink pad rainbow sampler set
10. Labeled Mason Jar Wall for Loose Supplies
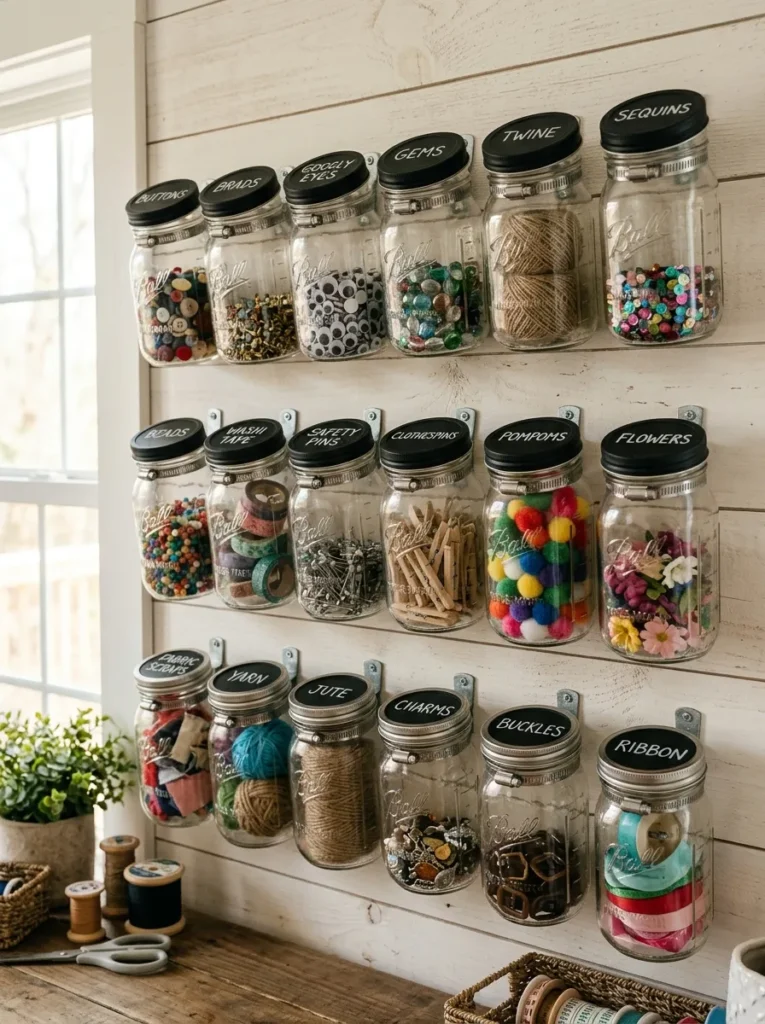
Vibe: Warm and grounded — the wall that makes a craft room feel like a real maker’s studio.
Why it works: Loose embellishments — buttons, gems, brads, beads, twine — are the supplies most likely to end up mixed together in a single container, making them practically unusable. Wall-mounted mason jars solve this through the principle of single-category containment combined with full visibility: each jar holds one supply type, and the glass walls mean you always know what’s inside and how much is left. The hose clamp mounting system is both industrial-chic and genuinely strong enough to hold fully loaded jars.
How to get it: Purchase galvanized hose clamps in the diameter that fits your chosen jar (standard wide-mouth Ball jars need a 3.5-inch clamp). Screw the clamp band directly into the wall stud or into a mounted plywood backer, then twist the jar into the clamp. Paint jar lids with chalkboard spray paint and label with a chalk marker — this allows labels to be wiped and changed when contents are reorganized.
Shop The Look
- Wide-mouth Ball mason jar set 16 oz
- Galvanized hose clamp bracket set wall mount
- Chalkboard spray paint black matte
- Chalk marker set fine tip white
- Button and embellishment assortment pack
11. Closet Craft Room Conversion with Bi-Fold Door Removal\
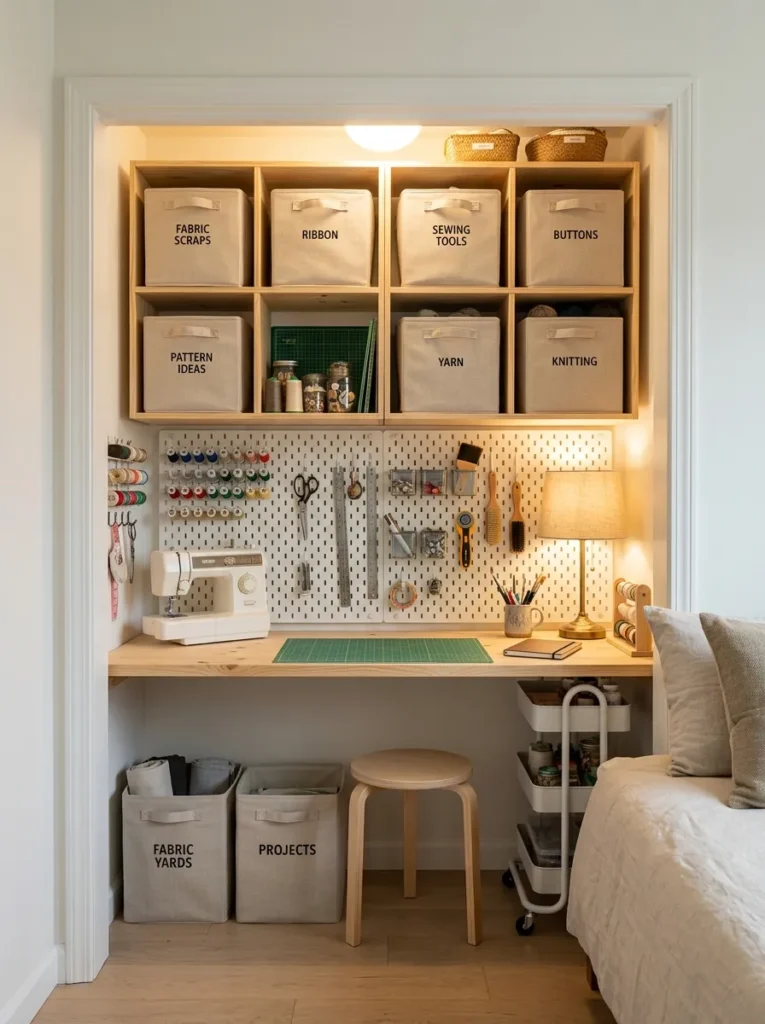
Vibe: Compact and serene — proof that a great craft room is measured in systems, not square feet.
Why it works: A standard bedroom closet — typically 24 inches deep and 5–6 feet wide — provides enough volume for a fully functional Craft Room station when the bi-fold doors are removed and the interior is properly planned. Removing the doors opens the nook to the room’s natural light, eliminates the cramped feeling of working inside an enclosed box, and allows full visual access to all supplies from outside the closet. This is the most efficient small-space craft room solution available, requiring zero new construction.
How to get it: Remove bi-fold doors by lifting them off the pivot brackets — no tools required for most standard installations. Paint the interior in a light warm white (Benjamin Moore White Dove works beautifully in enclosed spaces) to maximize light reflection. Mount a floating desk surface at counter height (36 inches) using heavy-duty shelf brackets rated for 100+ lbs, then add open cube shelving above using the existing closet rod holes as anchor points.
Shop The Look
- Heavy-duty floating shelf bracket set 12-inch
- Canvas fabric storage bin with label window
- LED closet light battery operated adhesive
- Cube shelf organizer bookcase white
- Small desk organizer tray set white
12. Vertical Die Cut and Punch Storage Tower
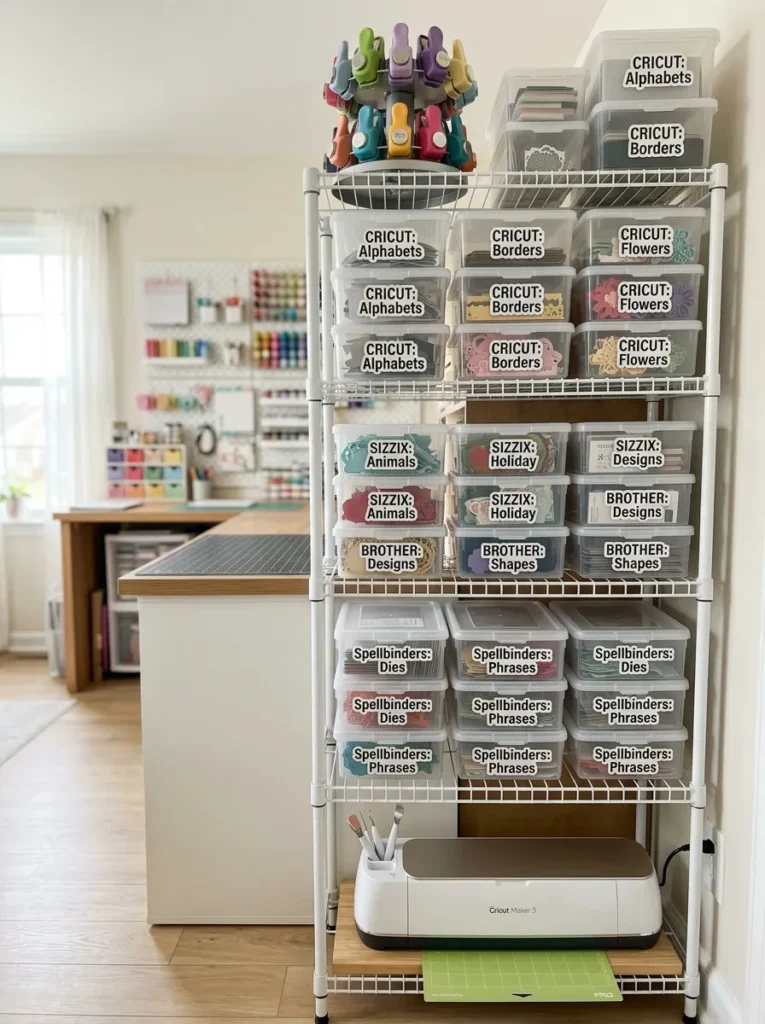
Vibe: Purposeful and ready — a system that makes your die cut collection actually usable.
Why it works: Die cuts and punches are bulky, irregularly shaped, and expensive — making them both the hardest supplies to store and the most important to protect. A dedicated vertical tower using clear stackable bins organizes dies by machine compatibility and shape category, while keeping them accessible without requiring the entire collection to be searched. The tower format — taller than wide — uses minimal floor space while holding a collection that might otherwise fill an entire shelf unit.
How to get it: Use a white wire or laminate shelving tower with adjustable shelves and stock it with clear shoebox-style bins (roughly 7x11x4 inches) that can be pulled out individually like drawers. Sort dies first by machine compatibility (Cricut, Sizzix, etc.), then by shape category within each machine. Print category labels using a label maker and affix to the front face of each bin at eye level for instant identification.
💡 Quick Win: Reusable plastic shoebox bins from dollar stores cost $1–$2 each and stack perfectly in most wire shelving units — label the front with a label maker and you have a professional die storage system for under $20 total.
Shop The Look
- Clear stackable shoebox storage bin set
- Label maker handheld with tape refills
- White wire shelving tower adjustable
- Paper punch carousel rotating holder
- Die cut storage sleeve album refill pages
13. Inspiration Board and Color Palette Wall
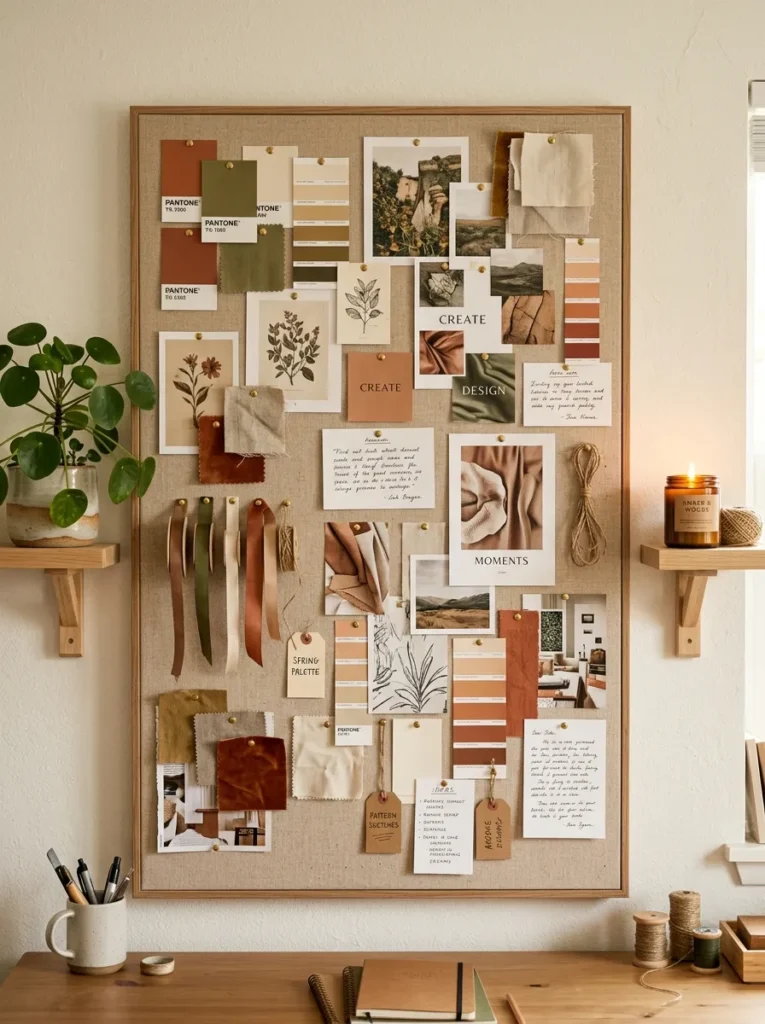
Vibe: Craft Room Creative and grounded — a wall that holds the feeling of every project you’re working toward.
Why it works: Every craft room needs one surface that isn’t about storage — it’s about inspiration. A large linen-covered corkboard serves a specific creative function: it externalizes your current aesthetic direction, making subconscious color preferences and style instincts visible and actionable. Designers, stylists, and professional makers all use some version of a mood board wall for this reason. When you can see your creative direction physically displayed, project decisions become faster, color choices become more confident, and creative blocks happen less often.
How to get it: Cover a standard 4×8 foot corkboard sheet (available at home improvement stores for under $25) with natural linen fabric stapled to the back, then mount it on the wall at eye level. Use brass push pins — not the plastic kind — for a finished look that elevates the whole display. Refresh the board at the start of every new project or season, pulling images from magazines, paint chips, fabric scraps, and printed photos that represent your current creative direction.
Shop The Look
- Large corkboard sheet 4×4 or 4×8 ft
- Natural linen fabric yard cut for corkboard
- Brass push pin set 100 count
- Small marble and gold desk accessories set
- Soy wax scented candle in glass jar neutral
How to Start Your Craft Room Makeover Transformation
Start with the pegboard wall. Before buying a single bin or basket, install a 4×4 foot pegboard panel above your primary work surface. This one move changes everything that follows because it moves your most-used tools off the desk and onto the wall, immediately revealing how much actual surface area you have to work with. Once you see the desk clear, every other storage decision becomes easier and more accurate.
The most common mistake craft room organizers make is buying matching containers before sorting their supplies. Beautiful matching bins mean nothing if the categories inside them are wrong — and most crafters discover during a real sort that their mental category system doesn’t match how they actually reach for supplies. Sort first into working piles on the floor, observe which categories naturally emerge, then buy containers sized to those actual piles. Buying bins first almost always results in wrong sizes and wasted money.
Three items under $50 that make an immediate impact: A set of six clear stackable bins with label holders ($14) that immediately makes any shelf readable; a pack of 50 brass push pins and a yard of natural linen to transform any corkboard into a proper inspiration wall ($18 total); and a spring-tension rod set for ribbon organization inside a single drawer ($8) — a five-minute install that eliminates one of the most common craft room frustrations permanently.
Realistic expectations: A basic sort, purge, and pegboard install can be completed in a single full day for under $75 in materials. A mid-level makeover with proper vertical storage, a fold-down cutting station, and labeled bins typically takes two weekends and lands between $150–$350. A full room transformation with custom shelving, a dedicated cutting height table, and a built-in inspiration wall usually runs $400–$800 DIY — still dramatically less than custom closet or studio installation quotes, which typically start at $2,000 or more.
Frequently Asked Questions About Craft Room Makeover Ideas
What is the difference between a craft room makeover and just organizing a Craft Room space?
A craft room makeover goes beyond tidying — it involves deliberately redesigning storage systems, surface zones, and workflow to match how you actually create. Basic organizing puts things away. A makeover creates permanent homes for every supply category so the room stays organized without ongoing maintenance. The key difference is intentionality: a makeover asks “does this storage system support my actual process?” before deciding where anything lives, rather than fitting supplies into whatever storage is already available.
What color should I paint a craft room for better focus and creativity?
Warm white tones — specifically soft whites with a slightly warm or greige undertone like Benjamin Moore White Dove (OC-17) or Sherwin-Williams Alabaster (SW 7008) — consistently outperform pure bright white in creative spaces. Pure white reads as clinical under artificial light and causes eye fatigue during long crafting sessions. Soft white reflects natural light beautifully and allows your supplies and projects to become the color in the room. A soft sage green accent wall is the one color addition that most interior designers recommend for creative workrooms.
How much does a DIY craft room makeover cost?
A basic makeover — pegboard, clear bins, floating shelves, and labels — can be completed for $75–$150. A mid-range transformation adding a fold-down cutting station, rolling cart, and drawer organization systems typically costs $200–$400. A full room overhaul with custom-height work surfaces, a dedicated fabric wall, and a closet conversion lands between $400–$800 for a DIY build. Professional custom installation for equivalent results starts around $2,500, making the DIY approach compelling at every budget level.
Can a small bedroom closet become a functional craft room?
Yes — and a converted closet is often more functional than a full room because everything is within arm’s reach. A standard 24-inch-deep, 60-inch-wide closet with bi-fold doors removed holds a full desk surface, pegboard wall, and 3–4 shelving sections above. The key constraints to plan around are lighting (add an LED strip or battery-operated overhead light immediately) and power (a single extension cord to a surge protector handles most Craft Room equipment needs). Closet conversions typically cost $100–$250 in materials and can be completed in a single weekend.
What is the best way to organize Craft Room supplies when you have multiple hobbies?
Craft Room Organize by activity zone rather than by supply type. Instead of grouping all scissors together, group all sewing supplies together, all paper crafting supplies together, and all painting supplies together — each activity gets its own defined zone or shelf section with everything needed for that hobby contained within it. This system means you can set up for any hobby in under two minutes because all its supplies are co-located, rather than assembled from across the room. Use a rolling cart to extend any zone temporarily when a project is active.
Ready to Create Your Dream Craft Room Makeover?
These 13 Craft Room ideas span the full range of what a craft room makeover can address — from wall-mounted systems and lighting choices to layout strategies, small-space conversions, and the often-overlooked importance of an inspiration wall. Transformation doesn’t need to be total to be meaningful — installing one pegboard panel or converting one drawer with tension rods this weekend is a complete, real improvement, not a half-measure. This weekend, start by sorting every supply into floor piles by how you actually use them — that single session will tell you exactly what storage systems you need before you spend a dollar. Once the systems are in place, the room starts working for you instead of against you, and the creative time you reclaim will make every project feel easier and more enjoyable. Save the ideas that match your space and your Craft Room your future self will thank you every time you sit down to make something.