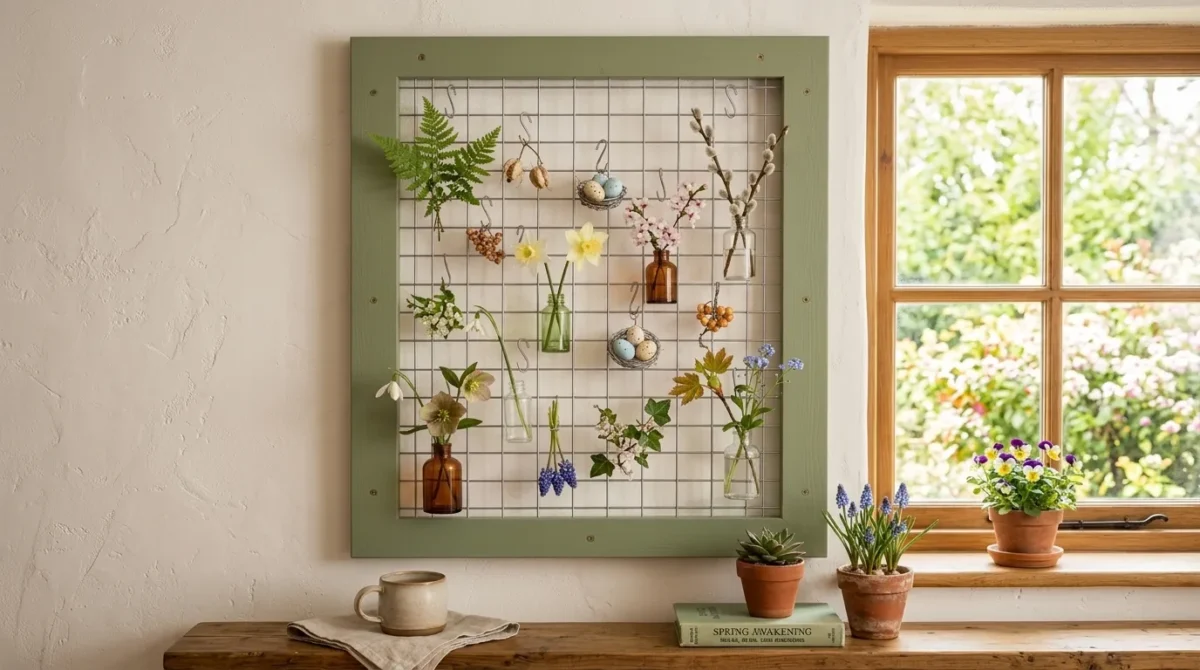
DIY hanging flower wall decor ideas use fresh, dried, artificial, or paper flowers — combined with wire frames, wooden hoops, macramé bases, driftwood, woven grids, and hanging structures — to create botanical wall installations that bring color, texture, and organic form to any vertical surface, from living room accent walls and bedroom headboards through wedding backdrops, event installations, and outdoor garden walls. This article gives you exactly 14 ideas spanning single-bloom arrangements, dense floral panels, mixed dried and fresh combinations, seasonal installations, and budget-friendly paper flower walls so every maker, every occasion, and every level of making experience finds a hanging flower wall idea that is achievable and genuinely beautiful.
A hanging flower wall done well reads as an art installation that happens to be made from plants — the specific three-dimensional quality of flowers at a wall plane, with depth created by varied stem lengths and bloom sizes, producing the kind of richly layered visual texture that no flat artwork or painted surface replicates. Here are 14 ideas worth making this weekend.
Why DIY Hanging Flower Wall Decor Ideas Work So Well
The hanging flower wall as a design element draws from several distinct making traditions simultaneously: the Japanese ikebana tradition (which elevates flower arrangement to an art form with specific spatial and compositional principles), the English cottage garden tradition (which values abundant, informal, multi-species planting over formal arrangement), the contemporary event design industry (which developed the dense floral backdrop as a photographic and social event feature from approximately 2013 onward), and the dried botanical wall art tradition (which has been a continuous feature of domestic interior decoration across European and American homes since the Victorian fern-collecting and flower-pressing movements of the 19th century). Each of these traditions contributes a different approach to the same fundamental material — flowers on a wall — and the 14 ideas in this list draw from all of them.
The material choice between fresh, dried, and artificial flowers for a hanging wall installation is the most fundamental decision the maker must make, and it shapes every subsequent choice about the project. Fresh flowers provide the most vivid color, the most complex fragrance, and the most authentic botanical quality, but they have a functional lifespan of 3–10 days depending on species and conditions, require refrigeration or water source access for extended event use, and cannot be stored and reused after installation. Dried flowers sacrifice some color vibrancy (most dried flowers develop the warm, faded, slightly amber-toned quality that is itself an aesthetic signature) and fragrance, but gain essentially indefinite lifespan, zero maintenance requirement, and the specific visual quality of preserved botanical forms — the papery texture, the retained seed head, the dried stem’s elegant curve — that is its own aesthetic rather than a compromise. Artificial flowers sacrifice botanical authenticity but gain perfect color saturation, zero maintenance, indefinite lifespan, complete seasonal availability, and the ability to include botanicals (peonies in mid-winter, tropical flowers in northern climates) that would otherwise not be available or affordable. High-quality silk or latex artificial flowers in natural species-accurate designs have reached a quality level that is genuinely difficult to distinguish from fresh flowers in a wall installation viewed from normal room distance.
Paper flowers (tissue paper, crepe paper, and cardstock) represent a separate category with its own significant design tradition — the Mexican papel picado and the festive tissue flower traditions, the contemporary giant crepe paper flower art of Tiffanie Turner and the large-scale paper installation designers, and the printable flower cut-file tradition supported by makers like SVG file designers and Cricut communities. Paper flowers at sufficient scale (30–60cm diameter) create a visual impact that genuine flowers rarely achieve at the same cost, and their DIY accessibility (the making skill required is basic cutting and shaping rather than floristry knowledge) makes them the most achievable hanging wall decor category for makers without floristry background.
Style at a Glance
| Element | Making Core | Design Edge |
|---|---|---|
| Philosophy | Flowers at the wall plane create depth no flat art replicates | The structure is as important as the flowers |
| Materials | Fresh, dried, artificial, paper flowers | Wire frame, wooden hoop, macramé, driftwood |
| Occasion Range | Daily home decor, events, weddings, seasonal |
14 DIY Hanging Flower Wall Decor Ideas
1. Dried Pampas and Eucalyptus Wall Bundle
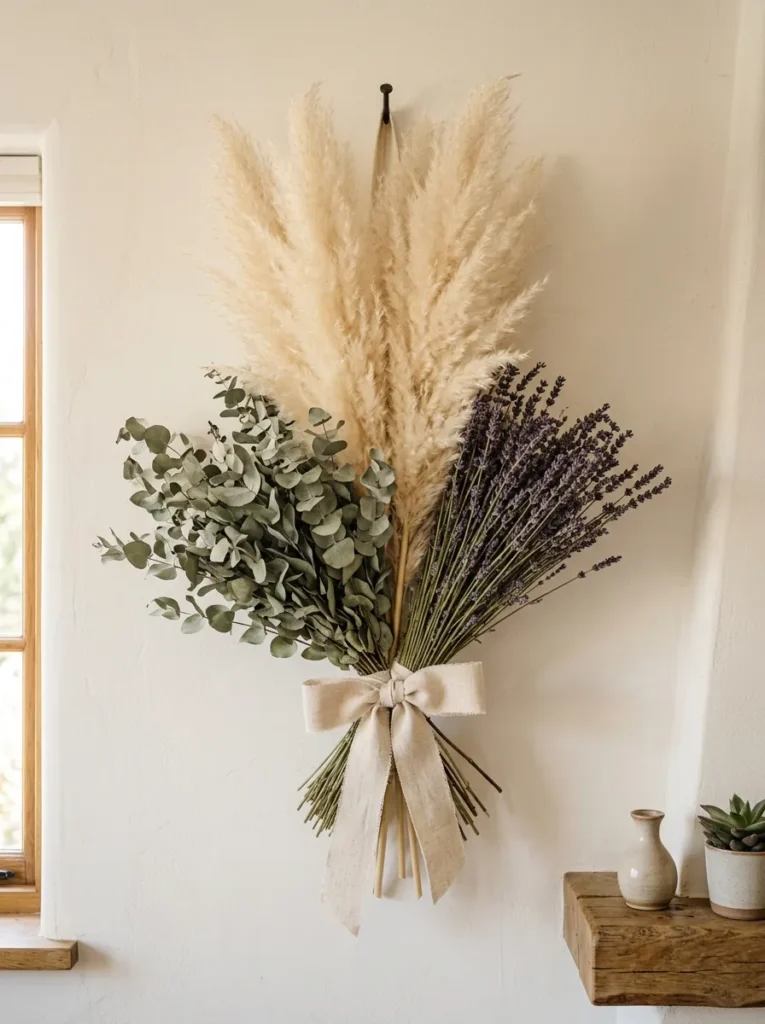
Vibe: The dried botanical bundle feels like something gathered from a country hedgerow and hung at the wall with deliberate care — simple in construction, rich in texture and scent.
Why it works: A combined dried botanical bundle applies the gathered abundance principle — the beauty of a wall bundle comes not from any individual botanical element but from the accumulated visual texture of multiple stems, plumes, and leaf forms combined at a scale that reads as genuinely substantial. The three-bundle combination (pampas for softness and scale, eucalyptus for color and scent, lavender for fine texture and fragrance) creates a botanical arrangement with three distinct texture registers (feathery, leaf-shaped, and fine linear) that together produce visual complexity the eye finds continuously interesting at both close and room distance.
Making time: 20–30 minutes.
How to make it: Gather the three botanical bundles, allowing each to fan slightly from a central stem gather point. Position the pampas as the back layer (widest and tallest), the eucalyptus as the middle layer (medium spread), and the lavender as the front layer (smallest and most refined). Align the stem ends at a consistent point and bind tightly with florist’s wire approximately 15cm from the stem ends. Tie a wide linen ribbon (5–8cm width) over the wire binding in a simple flat bow. Hammer a single large nail (60–70mm) into the wall at a slight upward angle and hang the bundle by its wire binding over the nail head.
Quick Win: A single large pampas grass plume ($3–8 from a dried flower supplier) hung from a single nail on a warm white wall with a small linen ribbon creates the dried botanical wall moment in under five minutes and for under $10.
Shop The Look
| Product |
|---|
| Dried pampas grass cream large plume |
| Dried eucalyptus bunch sage |
| Dried lavender bunch natural |
| Wide linen ribbon 5cm natural |
| Picture hanging nail large angled |
Also view: 8 One-Hour Crafts That Look Surprisingly Chic
2. Wire Hoop Flower Wreath with Trailing Ribbons
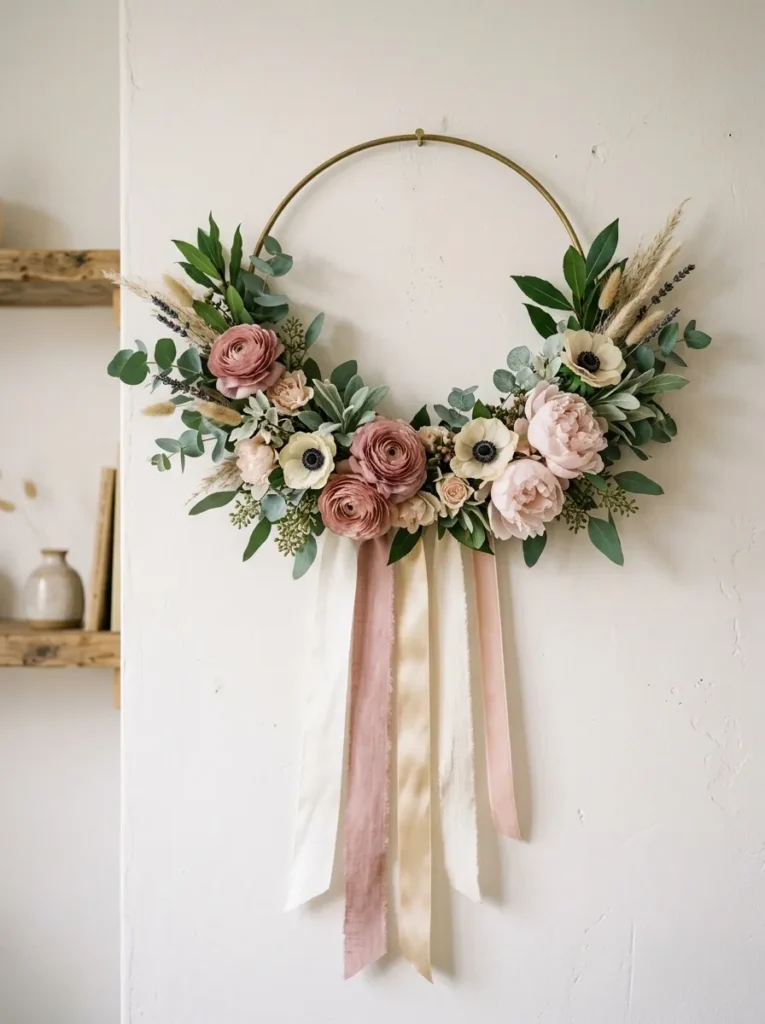
Vibe: The hoop wreath with trailing ribbons feels like a modern reimagining of the floral crown — botanical, ceremonial, and deliberately contemporary in its asymmetric placement and flowing ribbon tails.
Why it works: A wire hoop flower arrangement with trailing ribbons applies the composition-through-incompletion principle — a hoop wreath with flowers covering only two-thirds of its circumference (rather than the full circle) creates a more dynamic and contemporary composition than the fully covered circle, because the bare hoop section creates a visual rhythm between coverage and negative space that a uniformly covered wreath does not. The trailing ribbons extend the hoop’s visual presence downward, creating a vertical element that prevents the piece from reading as only circular and connects the hanging decoration to the wall space below it.
Making time: 45–60 minutes.
How to make it: Use a 45cm diameter brass or natural metal macramé hoop as the base. Cut flower stems to 5–8cm length and condition fresh flowers in water for several hours before arranging. Beginning at one side of the hoop, wire-bind the first stems to the hoop using florist’s bind wire, overlapping each subsequent stem over the wire binding of the previous to create a continuous flowing arrangement. Stop approximately one-third of the way around the hoop, leaving the final section intentionally bare. Cut five ribbons of varied textures (silk, satin, linen) in the chosen color palette at lengths ranging from 25cm to 60cm. Fold each ribbon at its midpoint and tie or loop through the hoop base at the covered section’s end. Hang from a single nail.
Shop The Look
| Product |
|---|
| Brass macramé hoop 45cm |
| Fresh ranunculus dusty rose bunch |
| Fresh anemone cream bunch |
| Eucalyptus stem fresh bunch |
| Varied ribbon set silk satin linen |
Also view: 9 IKEA KALLAX Inserts That Maximize Storage
3. Giant Tissue Paper Flower Wall for Events
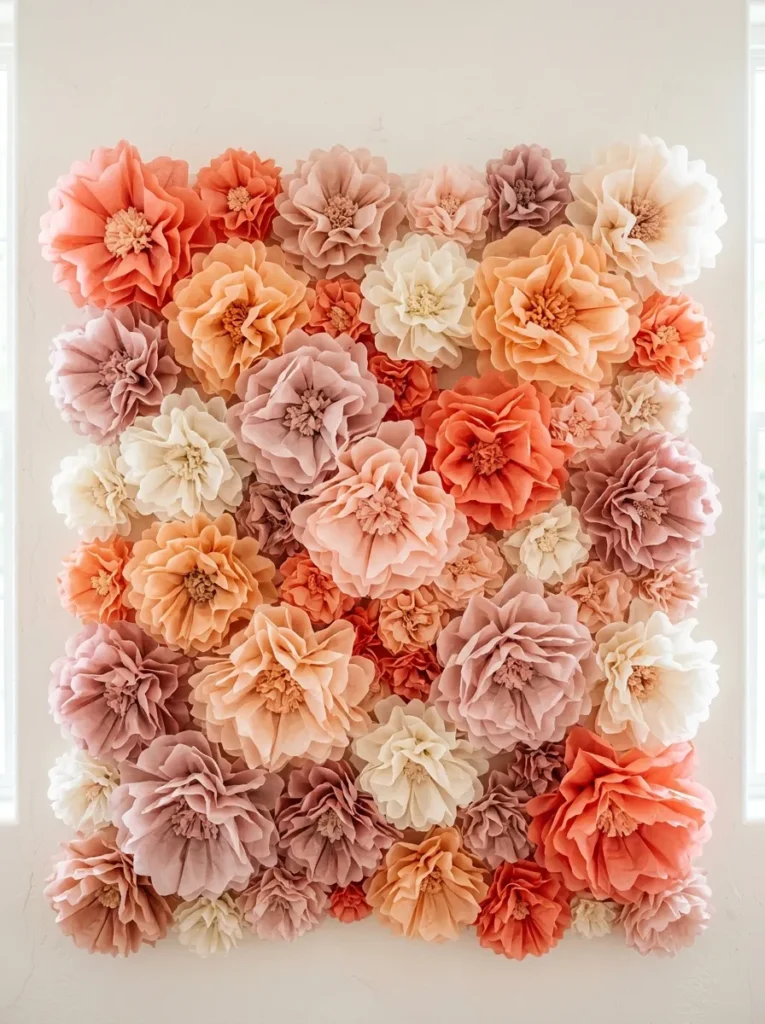
Vibe: The tissue paper flower wall feels like a celebration that decided to become architecture — the large-scale paper blooms creating a backdrop that is simultaneously festive, photogenic, and more beautiful than commercially produced alternatives.
Why it works: Giant tissue paper flowers for event backdrops apply the scale-up transformation principle — tissue paper flowers at 30–50cm diameter create a visual impact that genuine fresh flowers at the same diameter would require significant floral budget to achieve. Eight to twelve large tissue paper flowers in a coordinated color palette cover approximately 1 square metre of wall space at a materials cost of $15–30 (at $2–4 per flower in materials) versus the $150–400 that a comparable fresh flower coverage would typically cost. The making skill required — folding, binding, and shaping layered tissue paper — takes approximately ten minutes per flower to learn and ten to fifteen minutes per flower to execute once learned.
Making time: 10–15 minutes per flower; a complete 1m² backdrop requires 8–12 flowers and approximately 2–3 hours.
How to make it: Stack eight to ten sheets of tissue paper (standard 50×75cm gift tissue) in the chosen color. Fan-fold the entire stack in 4–5cm accordion folds. Pinch the folded stack at its center and bind tightly with a short length of florist’s wire or pipe cleaner, leaving two wire tails. Round both ends of the folded stack using scissors (for a rounded petal) or point both ends (for a pointed petal). Pull the tissue layers apart gently from the center outward, separating each sheet individually to create the full pompom form. Twist the wire tails together to form a hanging loop. Attach to the wall using the wire tail hooked over a small nail, or using sticky tack.
Shop The Look
| Product |
|---|
| Tissue paper set coral peach blush |
| Tissue paper cream and dusty pink |
| Florist wire thin reel |
| Sticky tack wall mount set |
| Scissors sharp craft |
4. Dried Flower Wreath in a Painted Wood Frame
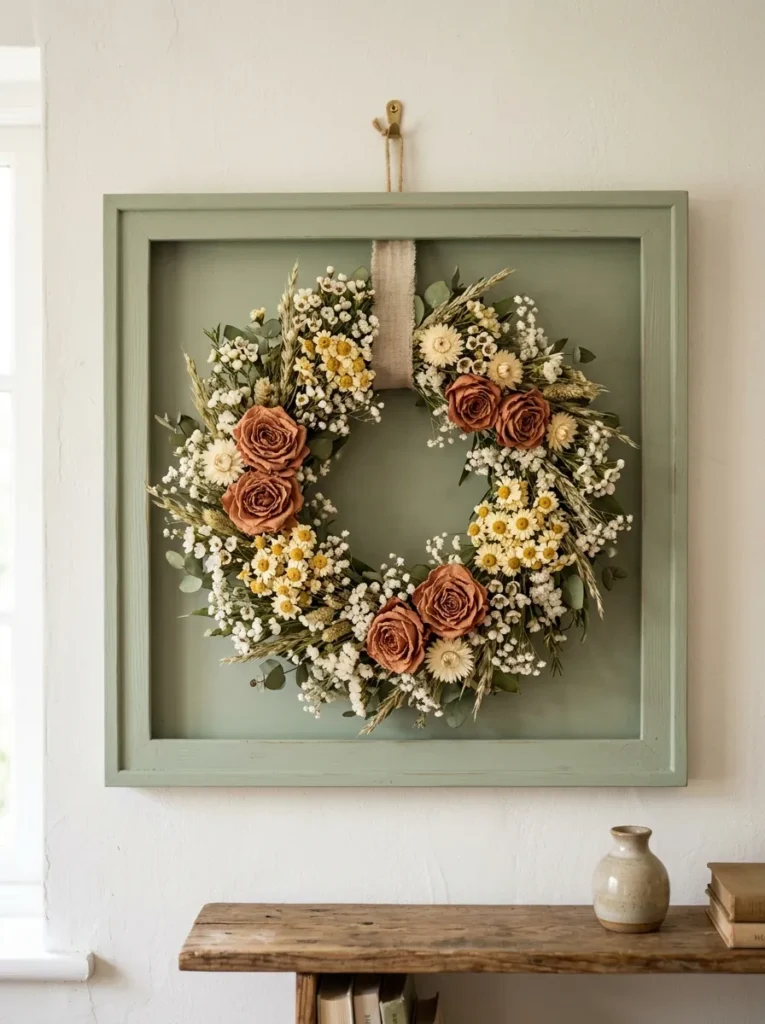
Vibe: The framed dried flower wreath feels like botanical taxonomy presented with a florist’s sensibility — the frame referencing art, the dried circle referencing nature, and the combination belonging to both.
Why it works: A dried flower wreath displayed within a square timber frame applies the artwork elevation principle — a dried flower wreath hung directly on a wall reads as a seasonal decoration; the same wreath positioned within a frame and hung as a framed artwork reads as a designed piece with the authority of framed art. The frame provides the compositional boundary (the visual edge that the eye uses to read any image as composed rather than accidental) that elevates the wreath from decorative to designed. The square format (rather than the circular frame that would simply echo the wreath’s own circular form) creates a shape conversation between the straight-edged frame and the organic circular wreath that adds compositional interest.
Making time: 45–90 minutes.
How to make it: Purchase or make a simple 50×50cm timber frame in the chosen paint color. Create the dried flower wreath on a 30–35cm wire or foam ring base, attaching dried stems using a low-temperature hot glue gun. Work around the ring consistently, overlapping each subsequent stem placement to cover all wire or foam base. Position the completed wreath within the frame and secure at the back using two small screw eyes through the frame back and a piece of wire connecting across the frame interior — the wreath rests on this interior wire support. Hang the frame as a conventional picture frame.
Shop The Look
| Product |
|---|
| Square timber frame 50cm painted |
| Wire wreath ring 30cm |
| Dried rose terracotta small |
| Dried chamomile bunch natural |
| Dried gypsophila bunch white |
5. Macramé and Flower Hanging — Textile and Botanical
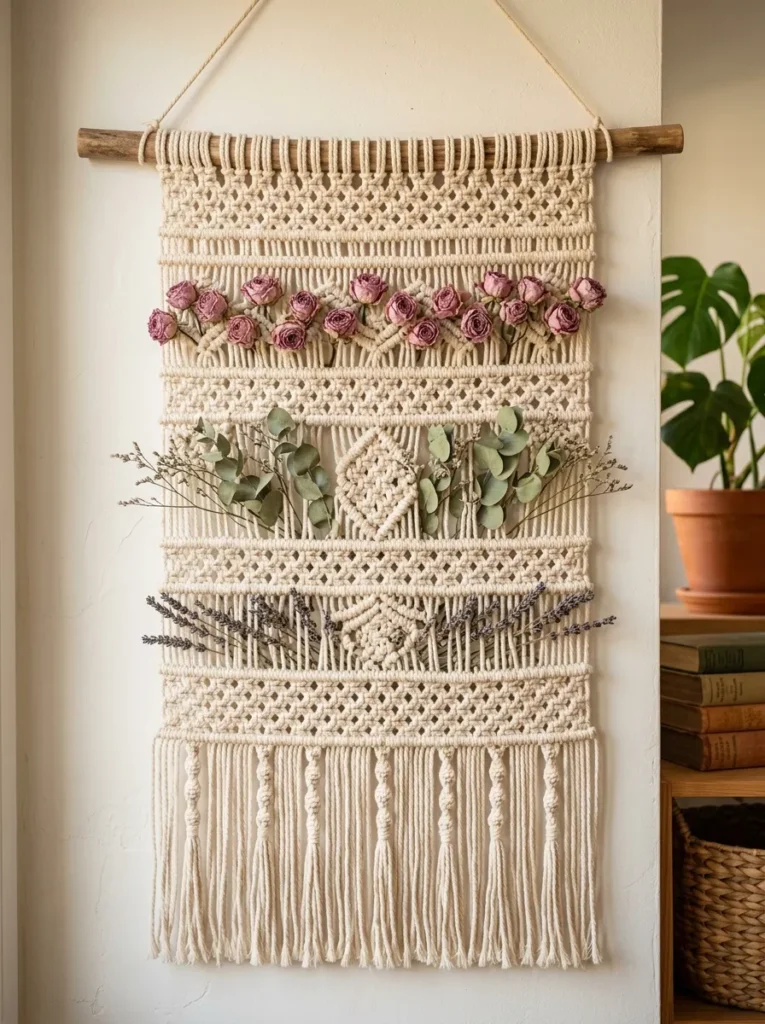
Vibe: The macramé flower hanging feels like two craft traditions discovering they are complementary — the textile’s geometric structure and the botanical’s organic softness creating together what neither achieves alone.
Why it works: A macramé panel with woven dried flowers applies the material dialogue principle — macramé (a textile craft based on geometric knotting patterns) and botanical decoration (an organic, irregular, curved material tradition) are conventionally presented as separate categories, but their combination in a single hanging creates a visual richness that neither tradition alone produces. The macramé provides structural consistency (the repeating knot pattern creates a geometric visual rhythm) against which the dried flower rows read as the organic accent; the flowers provide the color warmth and botanical texture that undyed cotton macramé in isolation lacks. Weaving the dried stems horizontally through the macramé rows (rather than attached to the front surface) integrates the two materials structurally rather than simply decorating one with the other.
Making time: 2–4 hours for the macramé; 30 minutes for the botanical integration.
How to make it: Cut 16 lengths of 4mm natural cotton macramé cord at 2 metres each. Fold each length in half over a 55cm wooden dowel using lark’s head knots to create 32 working cords. Work 15–20cm of square knot rows in alternating square knot pattern. Leave a 10cm gap in the knotting for the first botanical row, then resume knotting. Weave dried flower stems horizontally through alternate cords at each botanical row position. Continue knotting between each botanical row. Finish with a long fringe (10–15cm) below the final knot row.
Shop The Look
| Product |
|---|
| Natural cotton macramé cord 4mm |
| Natural wood dowel 55cm |
| Dried rose small stems set |
| Dried lavender bunch natural |
| Dried eucalyptus stems set |
6. Fresh Flower Installation on a Chicken Wire Frame
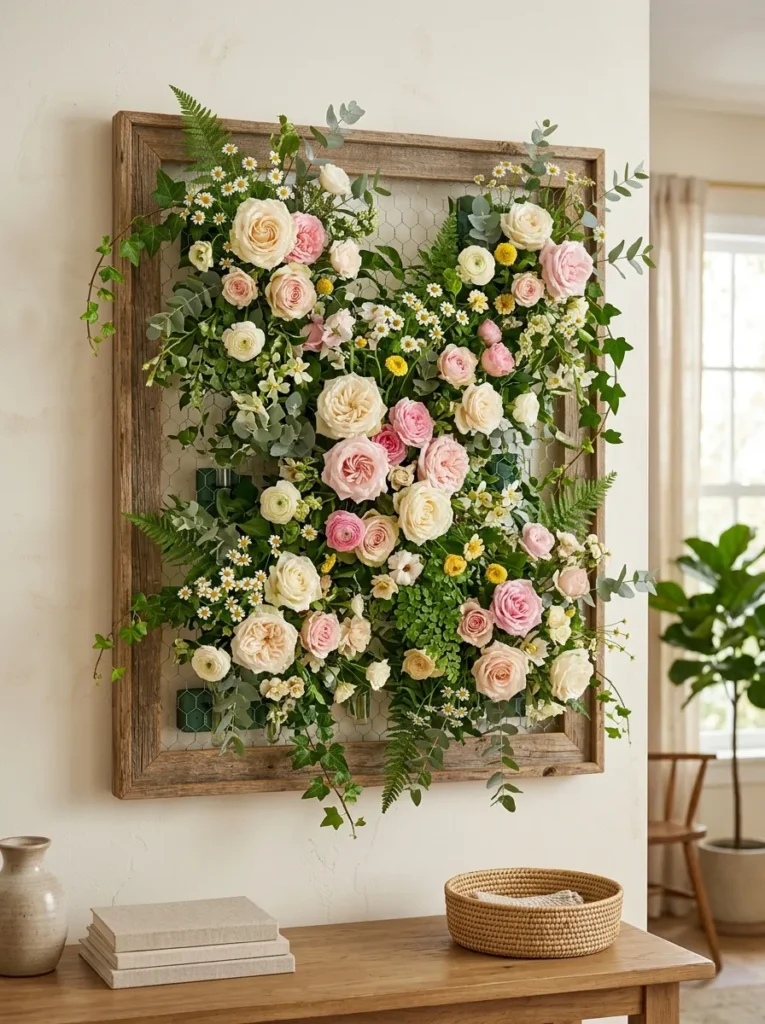
Vibe: The chicken wire fresh flower installation feels like someone brought a section of cottage garden wall indoors for an afternoon — the density and variety of the fresh flowers creating a living installation that no dried or artificial equivalent replicate.
Why it works: A chicken wire-based fresh flower installation applies the hydration management principle — the primary challenge of a hanging fresh flower display is providing the water access that extends the flowers’ lifespan beyond a few hours. Small plastic water tubes (available from florist supply companies — small tubes with rubber caps that seal around individual flower stems, keeping them hydrated for 24–48 hours) inserted through the chicken wire mesh and filled with water allow individual fresh stems to remain fresh and hydrated for the duration of an event or occasion. This hydration system converts the hanging flower display from a decoration that wilts within hours into one that lasts 1–2 days — sufficient for wedding receptions, parties, and photo shoots.
Making time: 2–3 hours for a 60×80cm panel.
How to make it: Build a simple rectangular frame from 40×20mm timber with staple-gun-applied chicken wire across the front face. Wire small plastic water tubes through the mesh at 8–10cm intervals across the frame surface. Fill each tube with water and cap with the rubber seal. Insert one or two fresh flower stems through each tube’s cap. Begin with the larger focal flowers (roses, peonies) in a balanced distribution, then fill with greenery between the focal flowers, and finally add small accent flowers to fill any remaining gaps. Hang from two D-ring hangers on the frame back using a picture wire.
Shop The Look
| Product |
|---|
| Reclaimed timber frame 60x80cm |
| Chicken wire hexagonal mesh |
| Plastic water tube floral set |
| Fresh garden rose cream and pink |
| Fresh ivy and fern greenery |
7. Crepe Paper Flower Garland
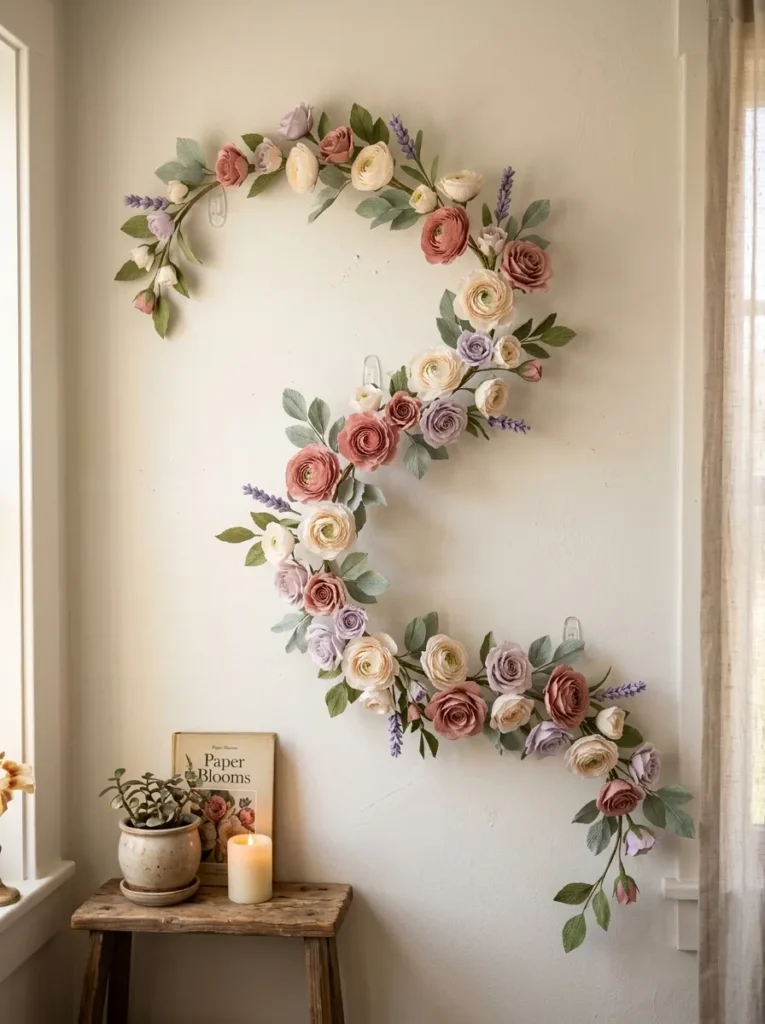
Vibe: The crepe paper garland feels like making’s most direct answer to the question of how to add color to a wall without painting — the handmade quality visible in every petal and leaf, the garland more beautiful for being clearly made.
Why it works: A crepe paper flower garland applies the continuous line design principle — where a cluster of hanging decorations creates a focal point, a garland creates a line that the eye follows across the wall’s horizontal dimension, creating spatial rhythm and visual movement. The garland format is the most versatile hanging flower format for domestic walls because it can be adjusted to any wall width, curved or angled to follow architectural features, and draped over door frames, across headboards, or around mantels with the same materials adapted to different installation contexts.
Making time: 4–6 hours for a 180cm garland with 12–15 flowers.
How to make it: For each flower, cut 5–7 circles from crepe paper (ranging from 4cm to 8cm diameter, increasing in size outward) and one small button-shaped center piece. Layer from smallest center outward, gathering each layer slightly at the base and securing with a twist of florist’s wire. Attach the flower to a 20cm length of 0.5mm florist’s wire by twisting the flower wire around the stem wire. Make 12–15 flowers in varied sizes and colors. Cut simple leaf shapes from sage green crepe paper and attach to short wire stems. Assemble by twisting all flower and leaf stems to a central thick florist’s wire in the desired sequence, varying the flower sizes to create visual rhythm. Mount the garland on the wall using small clear adhesive hooks at three points — the two ends and one midpoint.
Shop The Look
| Product |
|---|
| Crepe paper set antique rose cream |
| Crepe paper pale lavender dusty sage |
| Florist wire 0.5mm thin reel |
| Small clear adhesive command hook |
| Floral tape stem green cover |
8. Driftwood Branch with Hanging Dried Florals
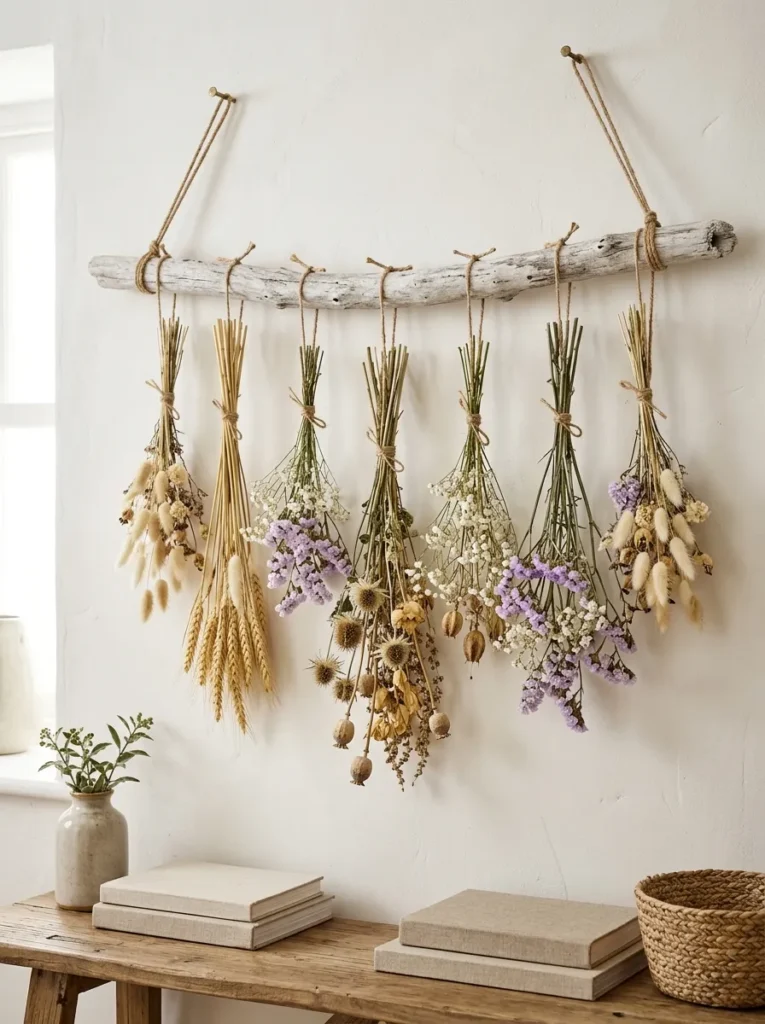
Vibe: The driftwood and dried floral hanging feels like a piece of the seaside that traveled inland — the weathered branch and the dried naturals sharing a material honesty that reads as found rather than made.
Why it works: A driftwood branch hung with dried botanical bundles applies the found-material structure principle — driftwood (or any weathered, irregular natural branch) provides a horizontal hanging structure with the organic irregularity that a purchased wooden dowel lacks. The weathered gray-white of driftwood sits specifically within the dried botanical palette — it is not a neutral support but a positive material element whose color and texture contribute to the composition’s overall quality. The individual hanging bundles at varied lengths create the vertical dimension that the horizontal branch alone does not provide, making the total piece occupy a wall space approximately equal to the branch width and the longest bundle’s length in a simple, elegant composition.
Making time: 30–45 minutes.
How to make it: Source driftwood from a beach collection, a dried flower supplier, or a craft retailer (natural wood branches dried to a pale, weathered appearance are sold as “driftwood” regardless of whether they are genuinely sea-weathered). Attach two lengths of jute cord (or cut leather cord) to each end of the branch, tying a simple loop large enough to fit over a wall nail. For each dried bundle: gather three to five stems of one dried botanical type and bind at the stem end with a 30cm length of thin jute twine, finishing with a simple knot. Tie the bundles to the underside of the branch at intervals, varying the drop length from 25 to 55cm. Space bundles at 8–12cm intervals along the branch.
Shop The Look
| Product |
|---|
| Driftwood branch natural 80cm |
| Natural jute cord thin hanging |
| Dried seed head bunch natural |
| Dried gypsophila bunch cream |
| Dried lagurus bunny tail grass |
9. Floral Alphabet Letter Wall Art
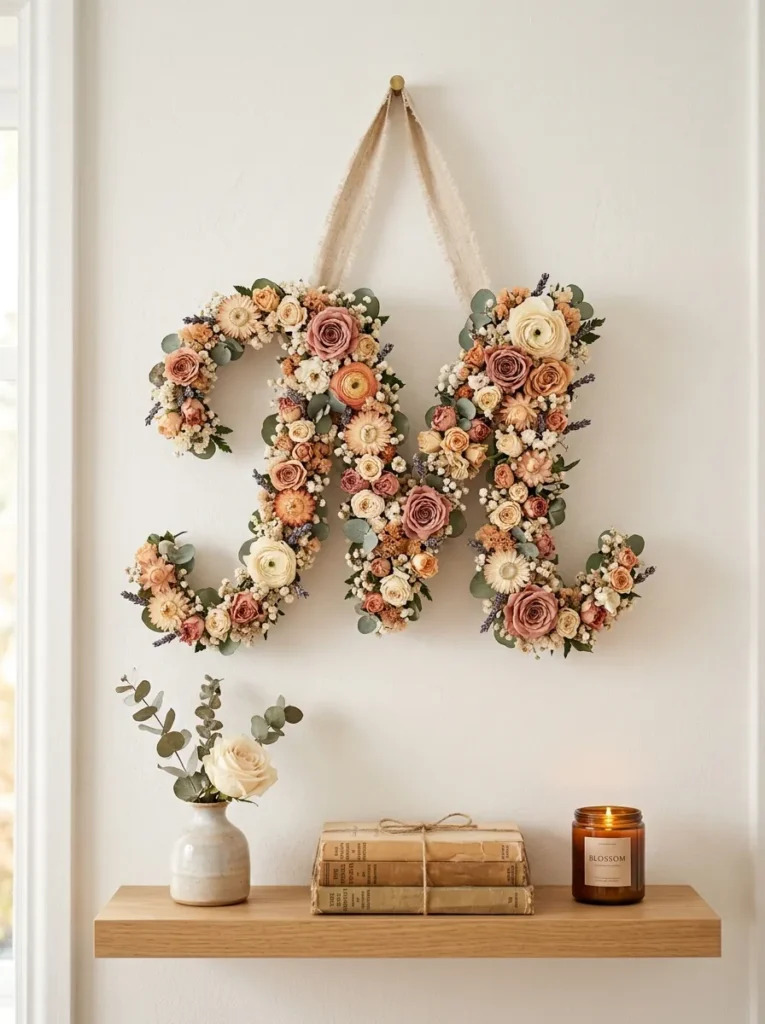
Vibe: The floral initial letter feels genuinely personal — the monogram format communicating identity while the floral covering communicates the specific aesthetic sensibility of the person whose initial it is.
Why it works: A floral-covered letter wall piece applies the personalization principle — a monogram initial is one of the most immediately personal decorating elements available because it has a specific human reference that no generic botanical or geometric decoration shares. The floral coverage (in contrast to a painted or plain letter) adds the material warmth that a flat object lacks and provides sufficient visual complexity at close range to reward examination. The letter’s relatively small scale (35cm height for a letter makes it visible and legible from across the room while remaining proportionally appropriate as a wall decoration rather than a statement piece) suits a wide range of walls and room contexts.
Making time: 60–90 minutes.
How to make it: Source a pre-made letter form from a craft store (papier-mâché or foam letter forms are available in most craft retailers in sizes from 20 to 40cm). Alternatively, cut the letter from thick cardboard. Apply a base coat of paint in the dominant flower color. Using a low-temperature hot glue gun, attach small dried or artificial flowers individually across the letter’s full surface, beginning at the edges and working inward, overlapping each flower over the glue base of the previous. Press each flower down firmly for three seconds before releasing. Create a hanging loop from a length of ribbon tied through a hole pierced at the letter’s top.
Shop The Look
| Product |
|---|
| Letter form papier-mâché 35cm |
| Small dried flower mix assorted |
| Low temperature hot glue gun |
| Glue stick set compatible |
| Natural linen ribbon hanging loop |
10. Fresh Flower Photo Wall — Memory and Botanical
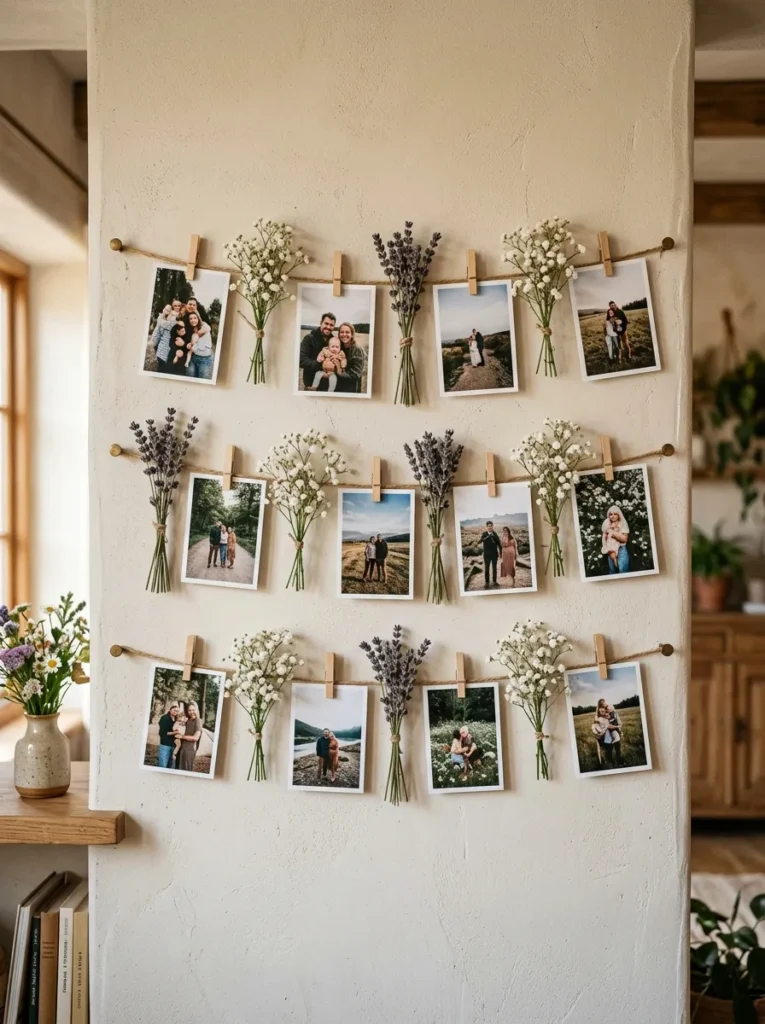
Vibe: The photo and flower wall feels like the most honest combination of memory and beauty available in domestic decorating — the photographs providing personal meaning and the botanical bundles providing sensory pleasure, together creating something neither could alone.
Why it works: A combined photo and fresh flower wall display applies the meaning-plus-beauty principle — photographs provide the personal narrative content (the specific memories, relationships, and moments that make a space genuinely inhabited rather than merely decorated) that botanical decoration cannot provide, while the fresh or dried botanical bundles provide the sensory and visual warmth that photographs alone (particularly small-format prints) lack. The jute string grid format is the most flexible photo display format available because the string can be repositioned (the nails moved) and the photographs and botanicals can be exchanged without any wall modification or rehanging.
Making time: 30–45 minutes.
How to make it: Hammer two nails 120cm apart at the same height on the wall. Tie a length of thin jute cord between the nails, pulling taut. Repeat at 30cm vertical intervals to create three parallel horizontal cord rows. Clip photographs to the cord using small wooden clothespins (available in multi-packs from craft retailers). Between each pair of adjacent photographs on each cord, tuck a small fresh or dried botanical bundle (tie three to five stems with a short length of fine jute and loop the tie over the cord). Alternate botanical types between adjacent bundles.
Shop The Look
| Product |
|---|
| Thin jute cord roll display |
| Small wooden clothespin set |
| Fresh lavender small bundle |
| Baby’s breath small bundle dried |
| Photograph print 10x15cm set |
11. Hexagonal Grid Flower Installation
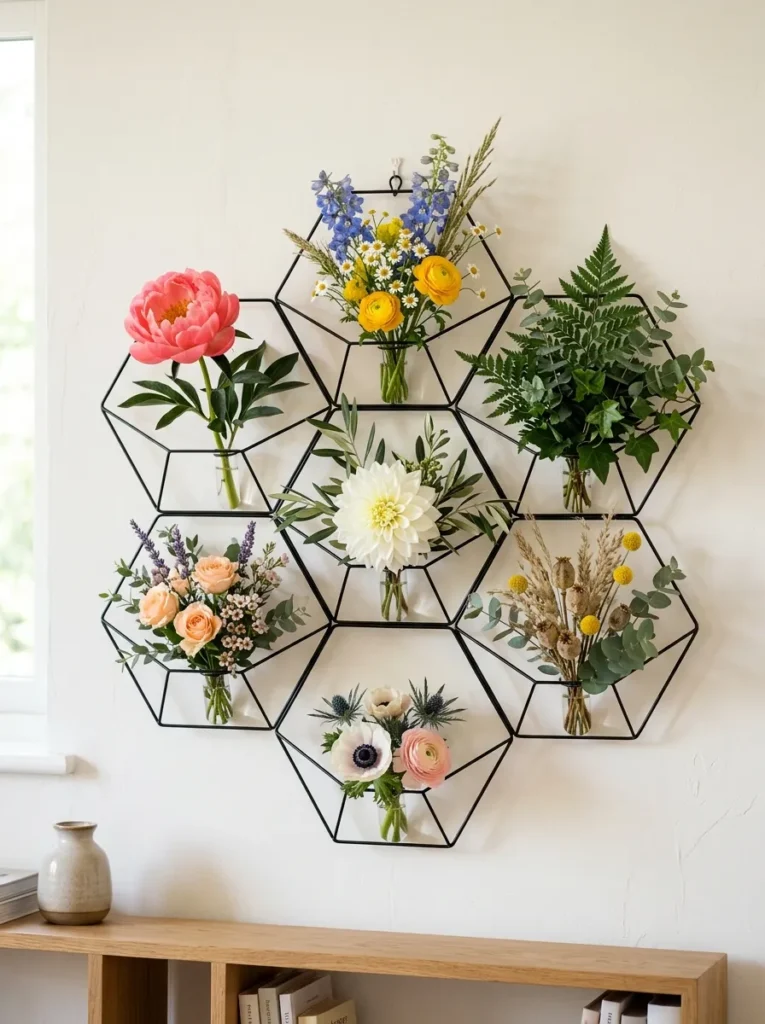
Vibe: The hexagonal grid installation feels like a geometric artwork that was planted rather than drawn — the mathematical precision of the hexagonal form in dialogue with the organic irregularity of the botanical contents of each cell.
Why it works: A hexagonal wire grid flower installation applies the structure-nature dialogue principle — the hexagonal cell is the fundamental structural form of the natural world (the honeycomb, the compound eye, the basalt column cross-section), making it a form that reads simultaneously as geometric design and natural reference. The varied botanical contents of each cell (some cells with single large blooms, some with clusters, some with greenery alone) create a botanical composition that follows a compositional logic — the eye moves from cell to cell finding variety and rhythm — while the consistent cell form provides the visual order that prevents the variety from reading as random.
Making time: 2–3 hours for grid construction; 30–45 minutes for botanical arrangement.
How to make it: Source a pre-made hexagonal wire grid (available from specialist craft retailers and plant/display supply companies) or construct from 1mm copper or black-coated wire using flat-nose pliers. Each hexagonal cell is constructed by bending a 50cm length of wire into a hexagonal form and joining the ends. Join seven cells (one center surrounded by six) by twisting adjacent sides together. Wire small glass test tubes (clear tubes available from floral suppliers) to the back of each cell as water holders for fresh flowers. Mount the grid on the wall using two small D-ring picture hangers on the grid’s top cells.
Shop The Look
| Product |
|---|
| Hexagonal wire grid craft black |
| Small glass test tube floral set |
| Single stem statement flower set |
| Small wildflower bunch mixed |
| D-ring picture hanger small |
12. Seasonal Flower Wall Calendar — Rotating Display
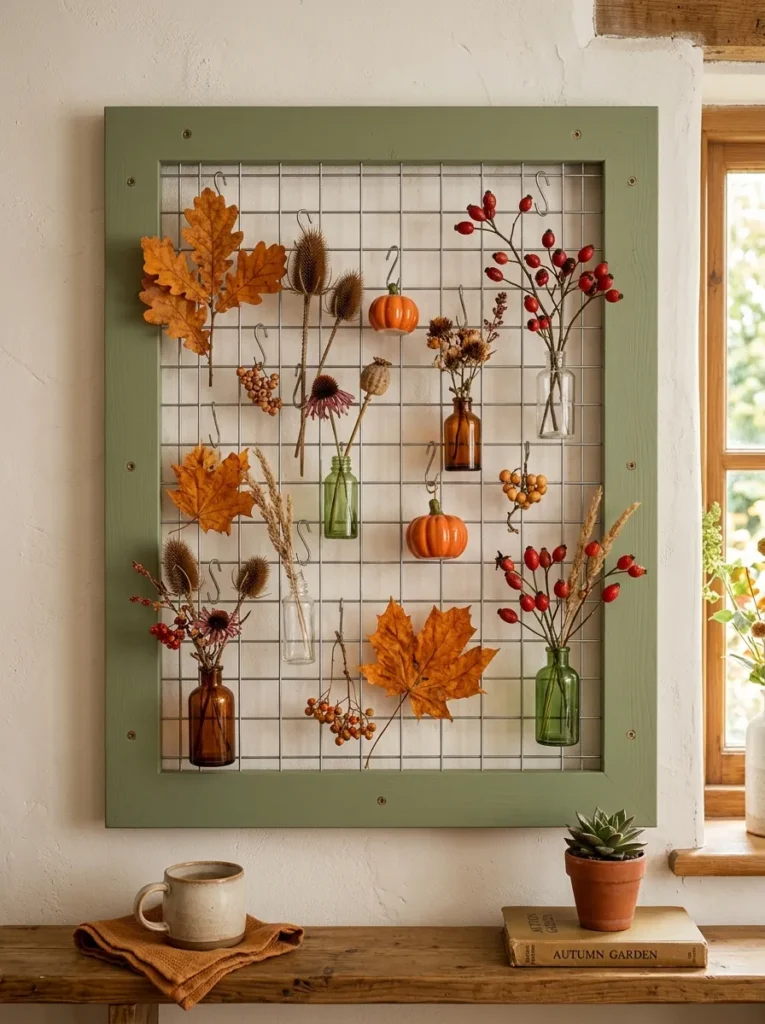
Vibe: The seasonal rotating wall display feels like a room that pays attention to the time of year — the calendar of natural seasonal materials making the wall an active participant in the household’s rhythm rather than a static background.
Why it works: A seasonal rotating flower wall display applies the living calendar principle — rather than a permanent fixed wall decoration, a frame designed for quarterly rearrangement creates a wall feature that actively changes with the seasons, keeping the room’s decoration connected to the natural world’s rhythm and providing a regular making activity that engages the household with a creative practice four times per year. The S-hook and vessel system (small bottles, test tubes, and vases hung from S-hooks on the wire grid) allows complete seasonal refreshes in 20–30 minutes without any tools, nails, or wall modification.
Making time: 60–90 minutes for the initial frame construction; 20–30 minutes for each seasonal refresh.
How to make it: Construct or repurpose a picture frame to approximately 60×80cm. Stretch garden wire or a metal wire grid across the interior of the frame, securing at the frame edges with staples. Paint the frame in the chosen color and allow to cure. Install D-ring hangers on the frame back. Source a set of varied small vessels (small glass bottles, ceramic mini vases, test tubes) and bend a short S-hook from florist’s wire for each vessel. At each seasonal transition, collect fresh seasonal botanicals (spring: fresh blossom and tulips; summer: garden roses and lavender; autumn: dried leaves, seed heads, rosehips; winter: dried pine, holly, dried citrus slices) and arrange in the hanging vessels.
Shop The Look
| Product |
|---|
| Wooden picture frame 60x80cm |
| Garden wire grid interior |
| Small glass bottle vessel set |
| S-hook florist wire set |
| Dried rosehip autumn set |
13. Paper Flower Origami Wall Grid
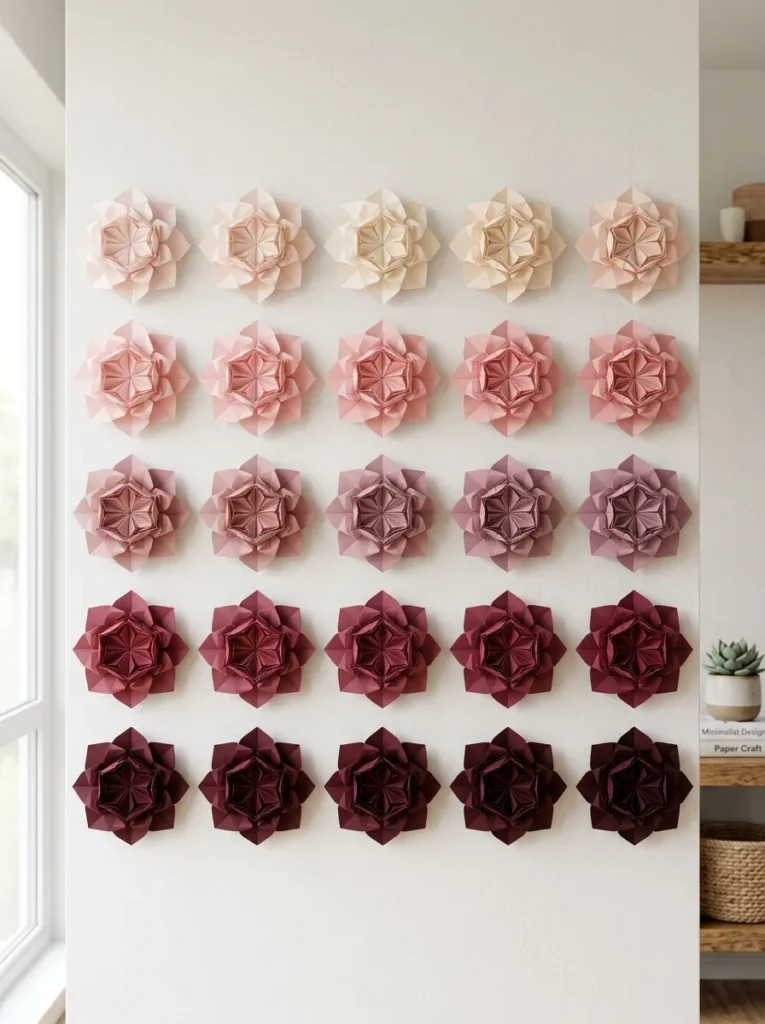
Vibe: The origami flower grid feels like a color study that chose to express itself as a botanical form — the systematic grid and the tonal gradient doing the work of design while the flower form provides the botanical warmth.
Why it works: A paper origami flower wall grid applies the repetition-and-variation composition principle — 25 identical forms arranged in a precise 5×5 grid creates visual order through repetition; the tonal gradient across the grid (darkest at one corner, lightest at the opposite corner) creates visual interest through variation. This combination of order and variation is the fundamental composition principle of all pattern design, and the paper flower’s three-dimensional form (which catches light and casts shadows across the wall surface) adds the dimensional quality that a flat pattern print cannot replicate. The grid is one of the most achievable wall art formats because each individual unit (one origami flower) is a small, manageable making task, and the completed installation is the result of 25 small tasks rather than one large one.
Making time: 5–8 minutes per flower; 25 flowers requires 2–3 hours total.
How to make it: Source or print 15×15cm origami paper in the chosen tonal gradient (papers available in sets of graduated color families from origami specialty suppliers). For each flower, fold a simple 4-petal open-bloom origami (instructions widely available as step-by-step paper folding guides online). Score and fold each petal slightly cupped inward for dimension. Arrange the 25 completed flowers on the floor in the intended grid before mounting, adjusting the color gradient placement until the transition reads smoothly. Mount to the wall using small double-sided adhesive foam pads (which provide a slight elevation from the wall surface that amplifies the dimensional quality).
Shop The Look
| Product |
|---|
| Origami paper tonal gradient set |
| Origami flower instruction template |
| Small foam adhesive pad double-sided |
| Ruler and pencil grid layout |
| Scissors sharp precision |
14. Wild Meadow Hanging — The Loose and Free Installation
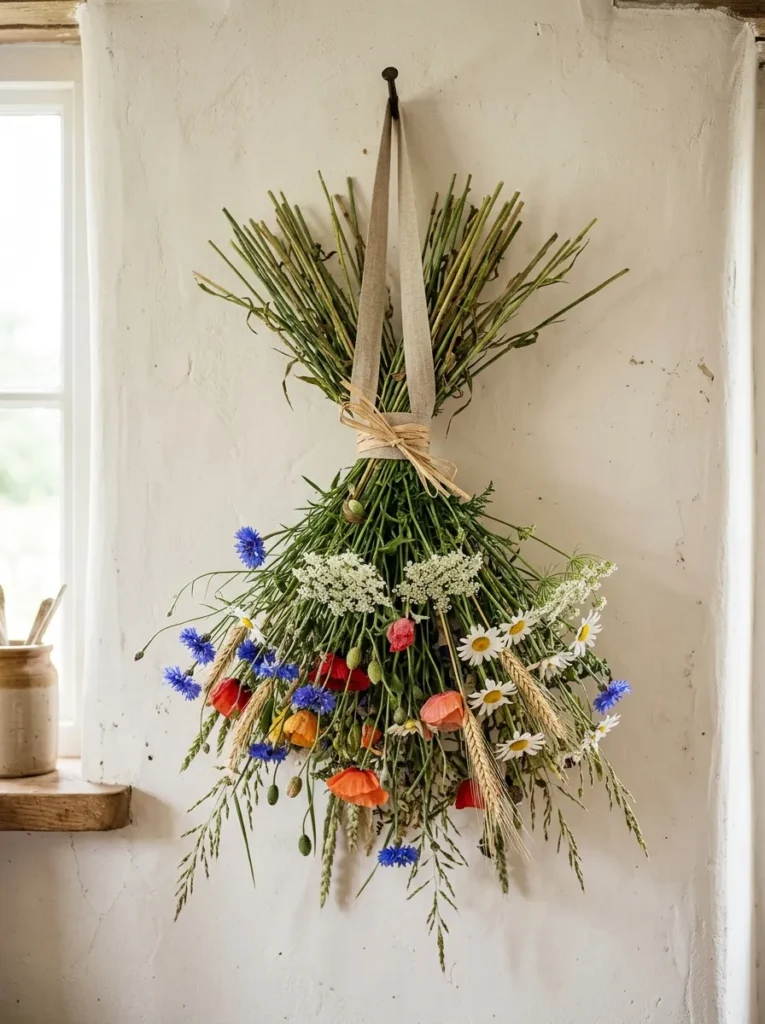
Vibe: The wild meadow hanging feels like the most honest possible answer to the question of what to hang on a wall — gathered from the field and hung as found, the arrangement entirely the flowers’ own doing.
Why it works: A wild meadow flower bundle hanging applies the anti-arrangement principle — the most authentic botanical wall decor is often that which has been deliberately not arranged: the stems allowed to settle at their natural lengths, the heads to face whatever direction the stem’s natural curve produces, the total composition determined by the botanical material rather than by the maker’s compositional decisions. This deliberate non-arrangement requires a specific making discipline — the restraint to gather and tie without adjusting, trimming, or composing — that produces a more convincingly natural result than careful arrangement can achieve. The tie at one-third from the top (rather than at the stem base, which produces a conventional bouquet) creates a distinctive silhouette: a fan of stems and leaves above the tie and a cascade of blooms and grass heads below.
Making time: 10–15 minutes — the fastest hanging flower wall idea in this list.
How to make it: Gather stems from a wildflower meadow, a wild garden, or a specialist wildflower supplier — the variety of species (minimum six to eight different types) is more important than any individual species’ presence. Allow all stems to remain at their natural, untrimmed lengths. Hold the gathered bundle loosely and allow the stems to settle naturally. Bind at approximately one-third of the total stem length from the top (not the bottom) with a 30-second tight wrap of florist’s wire. Tie a wide natural linen ribbon or raffia over the wire binding in a loose bow. Trim only the very base of the stems to a consistent flat cut. Hang from a single large nail through the ribbon bow, allowing the natural stem arch and the bloom positions to settle as the piece hangs.
Shop The Look
| Product |
|---|
| Wildflower meadow mix fresh or dried |
| Cornflower dried blue bunch |
| Dried wheat stem bundle |
| Wide natural linen ribbon 6cm |
| Large picture nail angled 60mm |
How to Start Your Hanging Flower Wall Decor Project
The single best first move before beginning any hanging flower wall project is making one small test piece — a single wire hoop with three flowers and two ribbon lengths, or a bundle of five dried stems tied with a linen bow and hung from a nail — before committing any design or budget to a larger installation. This test piece takes under thirty minutes and costs under $10 in materials but reveals three things that planning alone cannot: the scale relationship between the flower piece and the specific wall it is intended for (a piece that appears substantial in hand frequently appears small against a full wall), the material combination’s visual quality (certain flower and ribbon combinations that read well in a flat lay do not read as well in three dimensions against a wall), and the hanging mechanism’s reliability (a test piece reveals whether the chosen hook, nail, or adhesive is adequate for the weight of the intended larger piece). Make the test piece on the intended wall, step back to the room’s natural viewing distance, and assess what the wall needs before purchasing materials for the full project.
The most common mistake in DIY flower wall decor is under-scaling — making a piece that is too small for the wall it is intended for. A hoop wreath of 30cm diameter disappears against a 240cm high wall; a bundle of five dried stems reads as a small detail rather than a wall feature from across a room. The general scaling rule: a primary hanging flower wall piece should be a minimum of 40–50cm in its widest dimension for a feature wall application, 30–40cm for a side wall or corridor, and 20–30cm for an alcove or intimate space. Event backdrops and photo wall installations should cover a minimum of 100×150cm to read as a complete installation rather than a collection of individual elements.
Three specific items under $30 that enable the widest range of hanging flower wall ideas in this list: a pack of six assorted macramé hoops in natural brass or unpainted metal ($12–18, enabling Ideas 2, 9, and 11 and providing the most versatile structural base for any circular botanical arrangement); a bundle of dried pampas grass ($6–12 for three large plumes from a dried flower supplier, enabling Idea 1 immediately and providing the scale and texture that small dried flowers cannot achieve alone); and a reel of natural jute cord ($4–8, enabling Ideas 3, 7, 8, and 10 and providing the most universally appropriate tying, hanging, and structural material for botanical wall decor). These three items combined for under $40 enable multiple ideas from this list and represent the core inventory of a botanical wall decor making practice.
Frequently Asked Questions About DIY Hanging Flower Wall Decor
How long do fresh flowers last in a wall installation?
Fresh flowers in a hanging wall installation without a water source last between 12 and 48 hours depending on species, room temperature, and humidity. The longest-lasting species for unhydrated hanging applications are garden roses (12–24 hours), chrysanthemums (24–48 hours), and carnations (24–48 hours) — all species with waxy or thick petals that lose moisture more slowly. The shortest-lasting unhydrated are tulips, sweet peas, and most delicate cut flowers (4–12 hours). For installations requiring fresh flower appearance for longer periods, water tubes (small plastic vials filled with water that individual stems are inserted into) extend each stem’s life to 24–72 hours. For permanent installations, high-quality artificial or dried flowers are the appropriate specification.
What is the best adhesive for attaching flowers to a wall without damage?
For temporary installations (event use, seasonal decor, rental-property appropriate), the best wall-safe adhesives are: removable adhesive putty (BluTack, Scotch Mounting Putty) for very lightweight individual elements under 20g; 3M Command adhesive strips (small strips rated to 450g per strip) for hanging frames, hoops, and light structures up to 2kg; and removable adhesive hooks (Command hooks in varied weight ratings) for hanging structures that need periodic replacement. None of these leave permanent marks on eggshell or satin painted walls when removed according to the manufacturer’s instructions. For permanent or semi-permanent installations, standard picture hooks (small nails) are the most reliable and most aesthetically invisible hanging method available.
Can dried flowers be used outdoors for a garden wall installation?
Most dried flowers are not suitable for outdoor use — exposure to rain, direct sunlight, and humidity causes dried botanical material to decompose, fade, and lose structural integrity within days or weeks. For outdoor hanging flower wall decor, the appropriate specifications are: artificial UV-resistant flowers (designed for outdoor use, with UV-stabilized pigments and weather-resistant materials — read the product specification carefully, as standard indoor artificial flowers are not UV-resistant), or fresh flowers specifically for a single outdoor occasion (which can be installed the morning of an event and removed before evening when the humidity or dew causes wilting). Some dried botanicals (dried wheat, dried seed heads, dried pine cones) withstand light rain better than dried flowers and may be appropriate for covered outdoor areas.
How do you make a hanging flower wall last longer?
The primary strategies for extending the life of a hanging flower wall installation are: choosing species-appropriate materials (dried flowers rather than fresh for permanent installations, artificial flowers for rental-property or outdoor applications), treating dried flowers with a sealant spray (a UV-protective clear acrylic sealer available from craft retailers applied before installation reduces color fading by 40–60%), avoiding direct sunlight (UV exposure is the primary cause of color degradation in all dried and artificial botanical materials — position wall installations away from south-facing windows or use UV-filtering window film), and maintaining room humidity below 60% (high humidity causes dried botanical material to reabsorb moisture and begin decomposing — a dehumidifier in humid rooms or climates extends dried botanical life significantly).
What types of flowers work best for DIY flower wall decor?
The flowers with the highest performance-to-cost ratio for DIY hanging wall decor are: dried pampas grass (large scale, long-lasting, available in natural cream and dyed colors, provides the most visual impact per unit cost of any dried botanical); dried lagurus grass (small, fluffy, abundant in bundles, provides fine texture contrast to larger botanical forms); dried statice (dries in its natural color, provides fine detail at low cost); dried roses (retain their recognizable form when dried, available in many colors, work in all arrangement scales); and dried gypsophila (the fine white cloud texture that fills gaps and softens arrangements at minimal cost). For paper flower applications, large-format tissue paper poms and crepe paper open-bloom flowers provide the most visual impact at the lowest material cost.
Ready to Make Your Flower Wall?
These 14 ideas move through every dimension of what makes a hanging flower wall decoration genuinely beautiful — from the coastal simplicity of driftwood and dried botanical bundles, to the celebratory scale of tissue paper event backdrops, to the intimate precision of origami grids and hexagonal cell installations, to the deliberate anti-arrangement honesty of a tied wildflower meadow bundle hung from a single nail. Starting with the test piece — one small hoop, one bundle, one paper flower — on the actual wall at the actual scale before committing to the full project is not a cautious beginning. It is the beginning that reveals what the wall needs and what the material wants to do, so that the full installation arrives with exactly the confidence that knowledge produces. Gather one dried pampas stem and one length of linen ribbon today, tie them together, hang from a nail, step back to the room’s edge, and see what the wall becomes with one botanical element on it. Everything else in this list follows from that first small, specific discovery.